Every chord, lyric, and melody note you place lives on a beat grid inside a section. This chapter explains how sections, lines, and grid divisions give that grid its shape.
What you'll learn
- How sections organize a song and what each section type means
- How to create, name, and delete sections
- What every control in the section header does
- How lines and bars per line control the visual layout
- How grid divisions determine snap precision
- How section-level overrides let a bridge live in a different key or meter
- How alts keep other versions of a section, and how to turn one into a section of its own
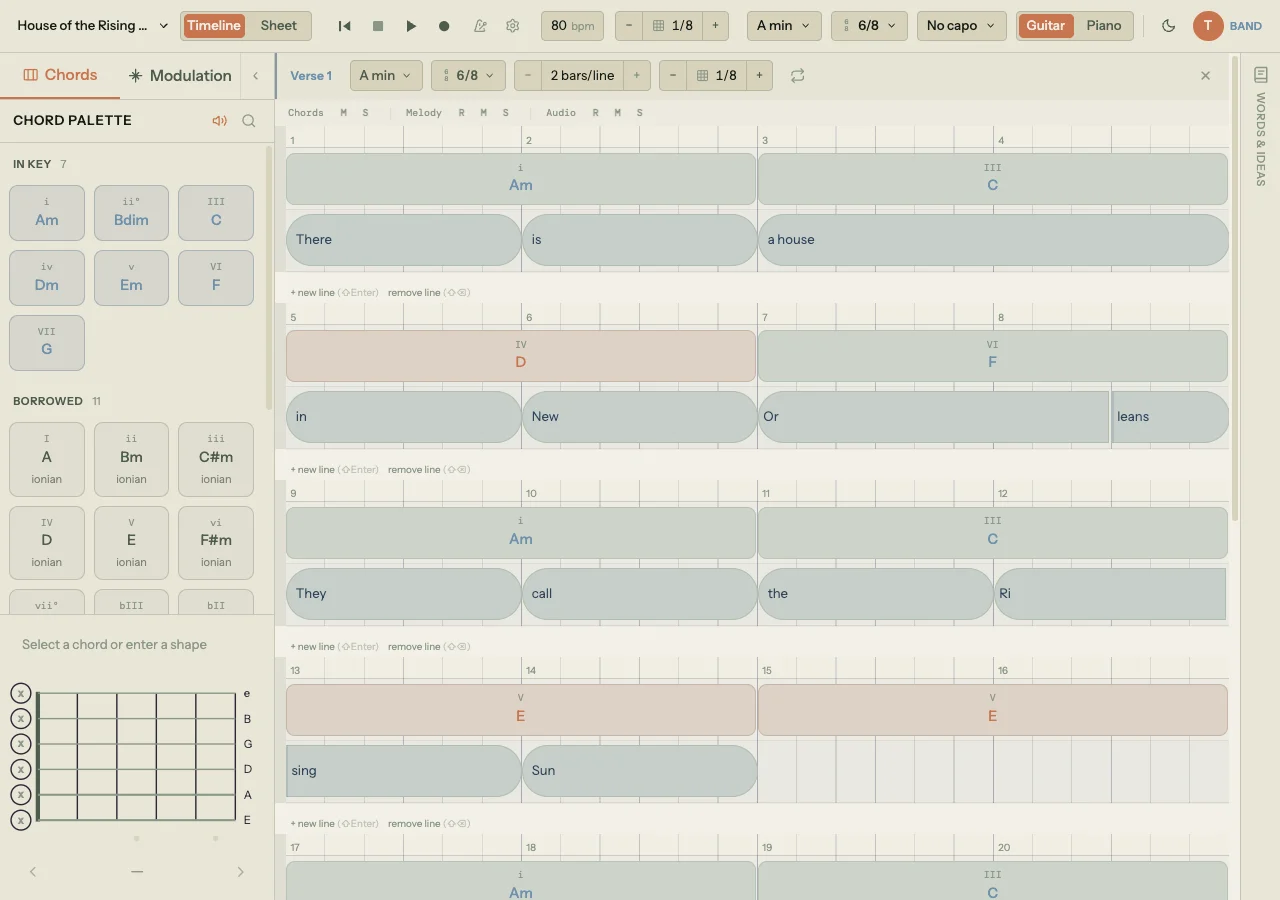
Chapter 4 covered the three ways into a song: lyrics, chords, or melody. Whichever you chose, the blocks you placed landed on a beat grid inside a section. This chapter is about the grid itself: how sections contain it, how lines divide it, and how grid divisions control how precisely blocks snap into place. If the previous chapters were about what to put on the canvas, this one is about the canvas.
5.1 How sections organize a song
A section is the top-level container for your song structure. Each section represents one structural part of the song: a verse, a chorus, a bridge, an intro, an outro, or any custom part you define. Sections stack vertically on the timeline, and together their order defines the arrangement of the song.
Each section is independent. It has its own beat count, its own lines, and can optionally override the song's key, mode, or time signature. When you play back the song, sections play in order from top to bottom (unless you've looped a specific section). When you export a PDF chord sheet or MIDI file, the same section order determines the output.
Section types
Song Cage recognizes seven section types. Each gets its own color swatch in the interface so you can visually scan the arrangement at a glance:
- Verse
- Chorus
- Pre-Chorus
- Bridge
- Intro
- Outro
- Section (the custom/generic type)
The type is a label, not a constraint. A "Verse" section doesn't behave differently from a "Chorus" section. Both hold chords and lyrics on the same kind of beat grid. The types exist to keep you oriented when a song has fifteen sections and you need to find the second bridge.
5.2 Creating and naming sections
Click + new section at the bottom of the last line in any section. Song Cage inserts a new section below the current one, with the generic "Section" type and a default name like "Section 1" (or "Section 2", "Section 3", and so on as you add more). You can also press ⌘⇧Enter on Mac (Ctrl+Shift+Enter on Windows/Linux) to insert a section below whichever section you're currently working in.
New sections start with two lines of two measures each, sized to the song's time signature. In 4/4 time that's 16 beats. In 6/8 time it's 12. In 3/4 time it's 12. The section is immediately usable: you can start dropping chords and lyrics on it without any further setup.
Assigning a type
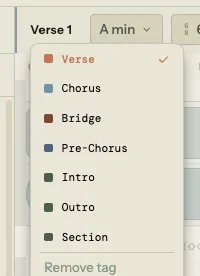
A freshly created section shows + section tag in its header instead of a name. Click that text to open the section type dropdown. Pick a type and Song Cage auto-names the section based on what you chose and what already exists:
- Pick "Verse" when there are no other verses: the section becomes Verse.
- Pick "Verse" when a Verse already exists: the section becomes Verse 2.
- Pick "Chorus" for the first chorus: Chorus. A second one: Chorus 2.
The same pattern applies to all seven types. If you want a custom name instead, double-click the section name in the header and type whatever you like.
Removing a type
If you assigned a type and want to go back to an untagged section, open the type dropdown and click Remove tag at the bottom. The section keeps its current name but the colored type indicator disappears.
5.3 The section header

Every section has a header bar that runs across its top edge. Reading left to right:
Drag grip. A vertical-dot handle that lets you grab the section and drag it up or down to reorder it. The grip is the only place that initiates a drag, so clicking anywhere else in the header won't accidentally pick the section up.
Section name/tag. Click to open the type dropdown. Double-click to edit the name directly. A freshly created section shows + section tag here until you assign a type.
Alt key and tabs. Right after the name sits a + Alt key that makes another version of the section. Once a section has two or more versions, the key gives way to a tab for each one (A, B, and so on), with a + after them for another. The pressed tab is the version showing. §5.10 covers alts.
Double section. An icon of two adjacent rectangles. Click to double the section's length and duplicate its chord blocks, lyric blocks, melody notes, and line breaks. Audio takes are left alone (they're one-shot recordings, not repeating patterns). An undo toast appears so a misclick is one click away from reversal. This is the fast way to turn a one-bar loop sketch into a two-bar section, or to extend a verse to match a recording that overhangs the section end.
Override badges (optional). When a section overrides the song's key or time signature, a highlighted
A minor6/8badge appears here so the divergence is visible at a glance. Click the badge to open the section settings popover and edit the override. Without an override, these badges aren't rendered: the section's key and meter live in the settings popover (control 9 below). See §5.7 for the full override flow.Loop toggle. Click to loop this section during playback. Shift+click to extend the loop to include this section and all sections after it. Click again on a looped section to clear the loop.
Auto Chords button. A button that appears once the section has enough melody notes to harmonize. Click it to open a ghost-chord preview that suggests a full progression. Chapter 9 covers Auto Chords in depth.
Melody Ideas button. Appears beside Auto Chords once the section has at least two melody notes. It opens a strip that makes new lines out of the section's melody, each one kept as an alt. §10.10 covers it.
Section settings. A sliders icon (right-side cluster) opens a popover with the section's bars per line, the key/mode override, the time-signature override picker, and New alt of this section at the bottom. Use it any time you want one section laid out differently from the rest, lifted to a different key, or in a different meter, without touching the song defaults.
Collapse / expand. A chevron that hides the section's lines while keeping the header visible. Useful for navigating long songs.
Delete. The
×at the far right removes the section and all its chord and lyric blocks. Song Cage asks first, and an undo toast appears immediately after, so if you clicked by mistake you can recover the section with one click. Sheet view can delete a section too: hover it and an×appears beside its tag, with the same question and the same undo.
5.4 Lines and bars per line
A section isn't one continuous horizontal strip. It's divided into lines, each showing a fixed number of bars. Lines are visual rows: they determine how the beat grid wraps on screen, the same way text wraps in a paragraph.
A line is always a whole number of bars. It never takes its length from your words, so bar lines land at the same spacing on every line of a section and the playhead crosses each one at the same speed. That matters because a lyric line is a different thing: it ends wherever you stopped writing, which is often mid-bar. Song Cage keeps the two apart and draws your lyric lines inside the grid as phrase marks, covered below.
The bars-per-line control
The default is 2 bars per line, which means each visual row shows two measures of music. In 4/4 time, that's 8 beats per line. In 6/8 time, that's 6 beats per line (since each 6/8 measure has 3 quarter-note beats).
Bars per line is a song setting. Click the time signature chip on the right of the toolbar (it reads 4/4 on a new song) and use the − and + under Bars per line to set anything from 1 to 8. Every section follows it, and new sections start from it. The effect is immediate:
- Fewer bars per line gives each block more horizontal space. This is useful when you're fine-tuning a chord change or positioning a syllable on a specific beat. It acts like zooming in.
- More bars per line fits more of the arrangement on screen at once. This is useful when you want to see the shape of a whole verse or compare sections side by side. It acts like zooming out.
A section can have its own value instead. Open its section settings (the sliders icon in the section header) and use the − and + at the top. That section keeps its value when you change the song's, and Inherit from song in the same place puts it back in step.
Song Cage sizes every line in a section from one full line's worth of bars, so a beat is the same width on every row and a bar in the last line looks like a bar in the first. The wider your window, the more room each beat gets at any given bars-per-line setting. A section whose beat count doesn't divide evenly ends on a short line, and that line stops where the music does rather than stretching to fill the width. There's no separate zoom slider. Bars per line is the zoom control.
Adding and removing lines
New sections start with two lines. A full verse or chorus will want more.
Hover a line and a small − / + pair appears in the narrow rail at its bottom-left corner.
- Add a line: Click
+, or press⇧Enter(Shift+Enter). The new line appears after the current one, and any blocks on later lines shift forward to make room. - Remove a line: Click
−, or press⇧⌫(Shift+Backspace). The blocks on that line are deleted and blocks on later lines shift backward to close the gap. The−is hidden on the last remaining line, because a section always keeps one.
When you add a line, Song Cage extends the section's total beat count by one line's worth of beats. When you remove one, it shrinks. The beat count is always a whole number of lines.
5.5 The beat grid
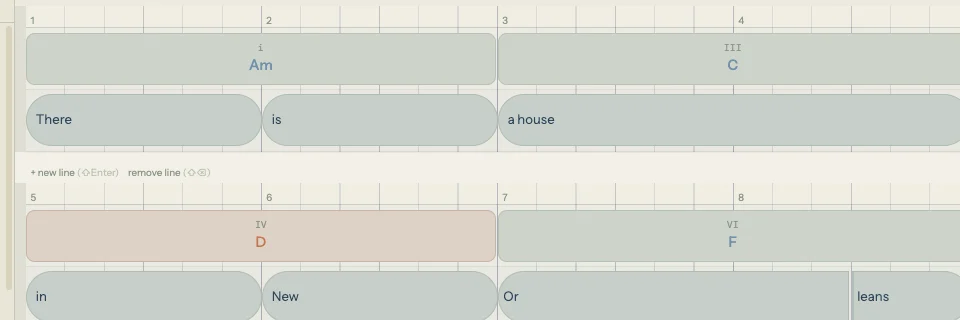
Each line displays a beat ruler along its top edge, showing measure numbers (1, 2, 3...) at regular intervals. When the lines are wide enough (roughly one bar per line or fewer), individual beat ticks appear between the measure markers. When lines are packed with more bars, the beat ticks hide to reduce visual clutter, but the measure numbers stay.
Below the ruler, two lanes stack vertically:
- The chord lane on top, where chord blocks sit.
- The lyric lane below, where lyric blocks (with their melody notes) sit.
Both lanes share the same beat grid. A chord at beat 4 and a lyric at beat 4 are vertically aligned because they occupy the same moment in the section. Everything you drag or resize on the timeline snaps to this grid, at the precision set by the grid division control.
The grid itself is drawn as faint vertical lines behind your blocks. Which lines appear depends on the grid division and how much space is available:
- Measure lines are always visible (the strongest lines).
- Beat lines appear when the grid is fine enough and there's room to show them.
- Subdivision lines (eighths, sixteenths, thirty-seconds) appear progressively as you increase the grid division precision and decrease bars per line.
In compound meters like 6/8, the grid groups beats in threes instead of twos or fours, matching the natural feel of the meter.
Phrase marks
There's one more thing drawn on the grid, and it comes from your words rather than the meter: a thin dashed vertical line marking where one of your lyric lines ends.
A line of the timeline is pagination, always a whole number of bars. A line of your lyric is a phrase, and it ends where you stopped writing, which is usually somewhere mid-bar. Both are real, and they rarely coincide. The dashed mark is how the grid shows you the second one without letting it distort the first.
It carries no layout weight. You can't drag it, and it never changes how wide a line is or where the bar lines fall. What it tells you is something the timeline used to hide: that your second line ends on the and of beat two, say, rather than squarely on a bar.
Sheet view and the exported PDF break on these phrase marks, so they show the lines you actually wrote. The timeline pages by bars. That's why the same song can read as seven lines in Sheet view and six rows on the timeline, and why both are correct.
The piano rolls (the section piano roll under the timeline, and a recorded take's roll) show both kinds of line too, told apart by shape: a single thin line for each bar, a double line where the timeline starts a new line, with Line 1, Line 2 and so on in the roll's ruler, and a dashed line where one of your lyric lines ends.
5.6 Grid divisions
The grid division control (the − / + snap stepper in the toolbar) sets how finely blocks snap when you drag or resize them. It also controls which subdivision lines appear on the grid.
Available divisions by time signature
The available divisions depend on your section's time signature:
Simple meters (2/4, 3/4, 4/4, 5/4):
- 1/1 (whole note): blocks snap every four beats. Offered only where a bar holds at least four beats (4/4 and 5/4), so 2/4 and 3/4 start at 1/2.
- 1/2 (half note): blocks snap every two beats
- 1/4 (quarter note): blocks snap to every beat. This is the default.
- 1/8 (eighth note): blocks snap to half-beats
- 1/16 (sixteenth note): blocks snap to quarter-beats
- 1/32 (thirty-second note): the finest resolution
Compound meters (6/8, 9/8, 12/8):
- dotted 1/4: blocks snap every 1.5 beats (one dotted quarter, the natural pulse of compound time)
- 1/8: blocks snap every half-beat
- 1/16 and 1/32: same as simple meters
Odd eighth meters (7/8):
- 1/8, 1/16, 1/32 only. The coarser divisions (whole, half and quarter note) don't map cleanly to asymmetric groupings, so they're not offered.
How to use it
The − button makes the grid finer (snaps to smaller note values). The + button makes it coarser (snaps to larger values). If you're positioning a lyric syllable that falls on an eighth-note pickup, set the grid to 1/8. If you're placing chords that last a full measure each, 1/4, 1/2 or 1/1 is all you need.
You don't have to reach for the toolbar. Press , for a finer grid and . for a coarser one (< and > work too), and a hint names the new division. Or hold ⌘ or Ctrl and scroll over the timeline, or pinch on a trackpad, and the new division shows under the pointer.
The division is a global setting: it applies to every section at once. If you change it while working in one section, the snap precision updates everywhere.
It's also the grid of the piano rolls, both the section piano roll under the timeline and a recorded take's roll. A note you drag there follows your hand between the lines and snaps onto a line once it comes within a sixteenth note of it. On a 1/8 grid or finer that covers the whole space between two lines, so every note lands on one; on a coarser grid a note can still sit between them on purpose. Hold Option (Alt) while you drag to place a note freely.
The arrow keys step by it as well. With chord or lyric blocks selected on the timeline, Option (Alt) plus Left or Right moves them one grid space earlier or later, and a block sitting between two lines goes to the next line in that direction first.
A good default workflow: leave the division at 1/4 for most work. Drop to 1/8 or 1/16 when you need to fine-tune syllable timing or place a chord on an offbeat. Come back to 1/4 when you're done.
5.7 Section overrides
By default, every section inherits the song's key, mode, time signature, and bars per line from the toolbar. But Song Cage lets you override any of these per section, which is how you build songs with key changes or meter changes that happen at a specific structural boundary. Bars per line is covered in §5.4; key and time signature are below.
Key and mode override
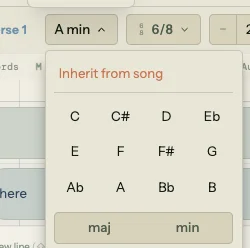
Click the section settings sliders icon (the right-side cluster of the section header). A popover opens with the section's bars per line at the top and a Key block below it: Inherit from song, Wander (no key), all twelve notes, and a major/minor toggle. Pick a key and mode, and the section now lives in that key. Once an override is set, a highlighted A min badge also appears on the left of the header next to the section tag, and clicking that badge is a shortcut back into the same popover. The override takes effect immediately:
- The chord palette re-ranks suggestions for that section using the new key.
- Borrowed chords shift to the parallel modes of the new key.
- Roman numeral labels on existing chords in that section update to reflect their function in the new key.
The badge changes to a highlighted style so you can see at a glance which sections have overrides. To revert, click the badge again and choose Inherit from song.
Key overrides are also how modulation works in practice. If your song is in C major and the bridge lifts to D major, you don't move every chord. You override the bridge section's key to D major, and everything in that section (suggestions, labels, modulation routes) reorients to the new key.
Time signature override
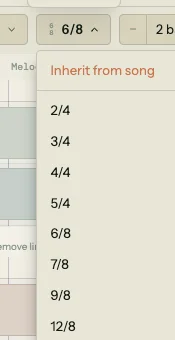
Open the same section settings popover (the sliders icon in the header). Below the Key block, a Time signature block lets you pick from the eight presets: 2/4, 3/4, 4/4, 5/4, 6/8, 7/8, 9/8, or 12/8. Song Cage resizes the section to hold what's already in it under the new meter: your last block's end, rounded up to a whole number of lines, with a one-line minimum. A section with blocks running out to bar four keeps four bars; an empty one shrinks back to a single line.
The grid lines, snap divisions, and beat ruler all update to match the new meter. Any blocks already placed stay at their beat positions, but the visual layout changes around them. As with key overrides, a highlighted 6/8 badge appears in the header once an override is set, and you can click it as a shortcut into the same popover.
To revert, open the popover and choose Inherit from song in the Time signature block.
5.8 The track bar

A single track bar sits across the top of the timeline, above the first section. It has three track labels: Chords, Melody, and Audio, and it controls the whole song. Each track has M (mute) and S (solo) buttons. Melody also has a small volume knob just before its M.
- Mute silences a track during playback. Mute the chords track to hear only the melody, or mute everything except the audio track to review a vocal take.
- Solo is the inverse: it plays only the soloed tracks and silences everything else. Solo the melody to hear it against nothing.
- The melody knob sets how loud the melody plays against the chords. Drag it up or down, or scroll over it; double-click it to reset to −7 dB. Chapter 13 has the details.
A track name dims when you won't hear it, so you can read the mix off the bar without working out which combination of M and S is in play.
Mute and solo apply to the whole song. To hear one section on its own, loop it with the section header's loop toggle (Section 5.3) rather than muting the others.
The bar is the mix and nothing else. Choosing which track a take records into happens beside the record button in the toolbar, not here. Chapter 10 covers recording in depth.
5.9 Deleting a section
Click the × at the far right of the section header. Song Cage asks first ("Delete "Verse 1"?"). Confirm, and the section disappears along with every chord and lyric block it contained, its alts included. An undo toast appears at the bottom of the screen with a single "Undo" button. Click it to restore the section exactly as it was.
5.10 Alts: other versions of a section
An alt is another version of a whole section: its chords, words and melody, its length and lines, and any key or time-signature override. Try a different chorus without losing the one you have. The section shows one alt at a time, and the alt showing is the section: you edit it with the normal tools, and it's what plays, what Sheet view shows and what an export carries. Only the section's name and type, and its recorded takes, are shared by every alt.
Making an alt
Click + Alt right after the section's name, or open the section settings (the sliders icon in the header) and click New alt of this section. Song Cage copies the section as it is and shows the copy in its place, so nothing on screen changes; the original is put away untouched as the first tab. From then on the header carries a tab for each version right after the section's name, A for the original and B for the copy, and a + after them that copies whichever one is showing into a new tab beside it. Delete back down to one version and the + Alt key returns. Sheet view has the same key and tabs beside each section's name, and they work the same way, so you can switch versions while you read the words. The + Alt key, and the tabs in Sheet view, are in the web app, the desktop app and the plugin; the iPad app gets them with its next update (until then, use section settings in Timeline view).
An alt made by a co-writer you invited (Chapter 16) carries their display name instead of a letter. Melody Ideas (§10.10) also writes every line it makes as an alt.
Switching between alts
Click a tab to show that version. While the song is stopped, it switches at once. While it's playing, it waits for the next bar line, so a looped section flips between versions on the bar instead of cutting in mid-chord, and the tab pulses until it lands. Click the tab that's showing to call a waiting switch off. A switch is one undo step, so Cmd/Ctrl+Z switches back.
Renaming, deleting, and making an alt a section
Double-click a tab to rename it, or right-click it for Rename, Make into new section and Delete. Clear a name and the tab goes back to its letter.
- Delete asks first, then shows an undo toast. Deleting the version that's showing shows the tab next to it. When only one version is left, the tabs go away and the section is an ordinary section again.
- Make into new section copies that version into a section of its own, right after this one, and keeps its tab where it was. The new section is named after both: Verse (B), or Verse (Bones) for a Melody Ideas alt. The recorded takes stay with the original section. It's one undo step. It's in the web app, the desktop app and the plugin; the iPad app gets it with its next update.
That's the grid. Every block you place, drag, or resize obeys the rules in this chapter: sections contain lines, lines contain beats, beats snap to the grid division, and overrides let any section break away from the song defaults when the music calls for it. The next chapter covers the first thing most writers put on the grid: lyrics.