The chord palette knows your key, watches your melody, and ranks every suggestion by what fits the moment you're in. You pick. It adapts.
What you'll learn
- How the chord palette organizes chords into In Key, Borrowed, and Secondary Dominants
- How ghost chord slots and suggestion chips guide your next chord choice
- How to try a different chord in place of one that's already on the timeline
- How melody-fit scoring ranks chords by the notes already on the grid
- How Borrowed Notes lets a borrowed chord move one melody note a half step to fit
- How Auto Chords generates a full progression from your melody in one click
- How to add extensions (7th, sus4, add9) and browse voicings
- How to edit, move, resize, and roll chord boundaries on the timeline
- How voice leading optimization smooths piano voicings across a progression
The last four chapters built up the lyric side of the timeline: sections, the beat grid, writing words, word tools, and syllable splits. This chapter is about the other lane. Every section in Song Cage has a chord lane above its lyric lane, and the chord palette is how you fill it.
Chapter 2 introduced the palette at a glance. Chapter 4 showed how chords can be a starting point. This chapter covers the mechanics: how to place chords, how the palette ranks them, how to shape their sound with extensions and voicings, and how to edit a progression once it's on the grid.
9.1 The three tabs
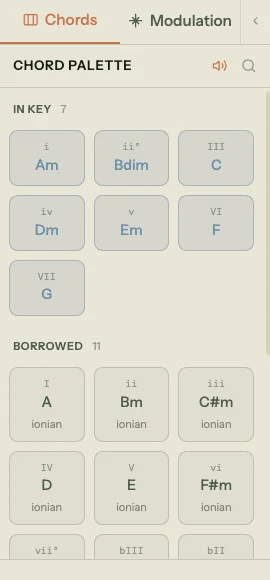
The chord palette lives in the left sidebar, under the Chords tab. It organizes every chord into three sub-tabs based on their relationship to your current key.
In Key
The In Key tab shows the seven diatonic triads for your current key and mode. In A minor, that's Am, Bdim, C, Dm, Em, F, G. In C major, it's C, Dm, Em, F, G, Am, Bdim. Each chord chip displays a Roman numeral label (i, ii°, III, iv, v, VI, VII in minor; I, ii, iii, IV, V, vi, vii° in major) so you can think in scale degrees.
These are the chords that belong to the key without any borrowing or alteration. Most progressions stay mostly here.
Borrowed
The Borrowed tab shows chords drawn from parallel modes. In a major key, borrowing pulls from Aeolian, Mixolydian, Dorian, Lydian, and Phrygian. In a minor key, borrowing pulls from Ionian, Harmonic minor, and Phrygian.
Each borrowed chord is labeled with its source mode so you can see where it comes from. A bVII in C major is borrowed from C Aeolian. A iv in A major is borrowed from A Dorian. These chords add color without leaving the key entirely. With Borrowed Notes switched on (§9.3), a borrowed chord can also move one melody note a half step to fit it.
Secondary Dominants
The Secondary Dominants tab shows V chords that resolve to non-tonic targets. V/ii resolves to the ii chord, V/vi resolves to the vi chord, and so on. These create momentary key shifts that pull the listener toward a specific chord before the key reasserts itself.
Secondary dominants are labeled with both their chord name and their resolution target (e.g., "E7" labeled "V/vi" in C major, resolving to Am).
When a section is in Wander mode (no key locked in), these three tabs are replaced by a chromatic chord grid. See Chapter 11 for the Wander UI and how key inference works there.
Chord search
Click the search icon (🔍) in the palette header, or press /, to open the chord search. Its field ("Type a chord, root, or quality: e.g. Cmaj7, F#, 7, sus, min7") is for the moments when you want something specific that isn't in your current key's palette. Type a full chord such as "Bbm7" and it comes first, followed by the other Bb chords and the other m7 chords. Type a root such as "Eb" to see every chord built on it, or a quality such as "sus" to see it on every root, with the in-key ones first. The results are chips you can use like any other chord.
The arrow keys move through the results, and the hint under them says what Enter will do. With a chord clicked on the timeline it reads Enter replace Am and swaps the highlighted result in (see Replacing a chord below). Otherwise Enter inserts it at the playhead, or at the end of the last section when playback is stopped.
9.2 Placing a chord
There are three ways to get a chord onto the timeline.
Ghost chord slots
Click an empty beat position in the chord lane and a ghost chord slot appears: a dashed-border box with a pulsing highlight. This is the pending target. The palette immediately recalculates its suggestions for that position, and suggestion chips appear inline near the ghost slot.
You don't have to mark the first one yourself. When you open a song in Timeline view, the first empty beat in its chord lanes is already marked, so the palette opens ready to place a chord.
Click any suggestion chip to place that chord. Or click a chord chip in the palette. Or drag a chord chip from the palette onto the ghost slot. All three produce the same result: a chord block at that beat.
Drag from the palette
In Timeline view you can also drag a chord chip from the palette directly onto any position in the chord lane, bypassing the ghost slot step. Rest the pointer on a chip and the chord lanes are outlined to show where it can go, with a hint such as Drag Am onto a beat or a chord; while you drag, the lane under the pointer gets a heavier outline.
Drop the chord on an empty beat and it snaps to the grid as a new chord, one grid cell wide. Drop it on a chord that's already there and it replaces that chord, keeping its start and length. While you drag over a chord, the old chord fades and a dashed outline of the new one covers it, so you can see what the drop will do before you let go.
Sheet view
In Sheet view, small + markers appear between words in each lyric line. Click one to set a pending chord target at that word boundary, then pick a chord from the palette. Song Cage places the chord above the word and, if the lyric block spans multiple words, splits it at the nearest word boundary so the chord aligns cleanly.
Audition mode
When you place a chord by clicking a palette chip at a marked beat, it enters audition mode. The chord block highlights, the mini fretboard or keyboard in the edit popover shows the default voicing, and you can preview the sound by clicking the speaker icon. A waveform icon next to the speaker toggles preview notes individually, which plays palette and timeline chord clicks one note at a time so you can hear each voice.
While a chord is in audition mode:
- Left/Right steps through the palette in render order (Fits Melody / Replace, then In Key, Borrowed, Secondary Dominants), one chip at a time. Clamps at the first and last chip: no wrap.
- Up/Down moves to the chord directly above or below in the palette grid. Same column, next or previous row in the current section, flowing into the next non-empty section at the same column when you reach a section's edge. Clamps at the top and bottom of the panel.
- Shift+Left/Right cycles extensions on the current chord (triad → 7 → maj7 → 9 → sus4 → sus2 → add9 → 6, filtered to what's valid for the chord's quality).
- Shift+Up/Down cycles voicings of the current chord (Up = next voicing).
- Enter commits the chord.
- Escape cancels (removes the chord if it was newly placed, or reverts to the previous chord if you were replacing an existing one).
When you double-click an existing chord, audition opens at the first chip in the palette panel: the first Fits Melody or Replace suggestion if the strip is showing, otherwise the first In Key chord. Pressing Escape reverts to the block's original chord. Exactly one chip is highlighted at a time (the cursor), and the panel auto-scrolls so the cursor is always in view as you move between sections.
Audition mode is a try-before-you-commit step. Every arrow press previews the new chord, and the timeline chip, the highlighted palette chip, the fretboard, and the keyboard panels all update together so you can see the full impact of each change before it becomes permanent.
You can also arm a chord from the palette without placing it yet: with no beat marked and no chord clicked on the timeline, click a chord chip and the same arrow keys take over. In palette-armed mode, Left/Right also carries the active extension across chord walks (so a 7-flavor stays a 7-flavor as you step through). Press Enter to insert the armed chord at the playhead (or the end of the last section if playback is stopped). This is useful when you want to hear a progression before adding to the timeline.
Replacing a chord
To swap a chord that's already on the timeline, click it, then click the chord you want in the palette. You can also walk onto a chord with Left / Right instead of clicking it (Chapter 18). As soon as you land on the chord, the palette shows what could replace it (see 9.3).
- The first click on a chip tries that chord in place of the old one. You hear it, and the block shows the new name in italics with a pulsing outline. Click other chips to try those instead. Every chip in the panel works this way (the In Key, Borrowed, and Secondary Dominants grids, the suggestion strips above them, and chord search results), and so does the dice in Wander mode.
- Click the same chip again, or press Enter, to keep it. Once you've picked a chord, clicking somewhere else keeps it too.
- Press Escape to put the old chord back.
Sheet view works the same way: click a chord above the words, then click a chip, and the chord being tried shows in italics on the sheet until you keep it or press Escape.
Only a chord you clicked or walked onto gets replaced. A chord that's selected because you just placed or typed it is left alone, so clicking chips just to hear them never rewrites it. Click the chord first when you do want to change it.
On the timeline, double-clicking a chord, or selecting it and pressing Enter, opens the same try on the top suggestion instead, ready for the arrow keys. You didn't pick that chord, so clicking away or pressing Space before you change anything puts the original back. Any change you make (a chip, an arrow key, an extension, a voicing) counts as a pick and is kept.
9.3 Suggestions and melody fit
Click an existing chord block (or double-click it) to enter replace mode, or click an empty beat to enter place mode. Either way, the palette recalculates and new sections appear at the top of the panel.
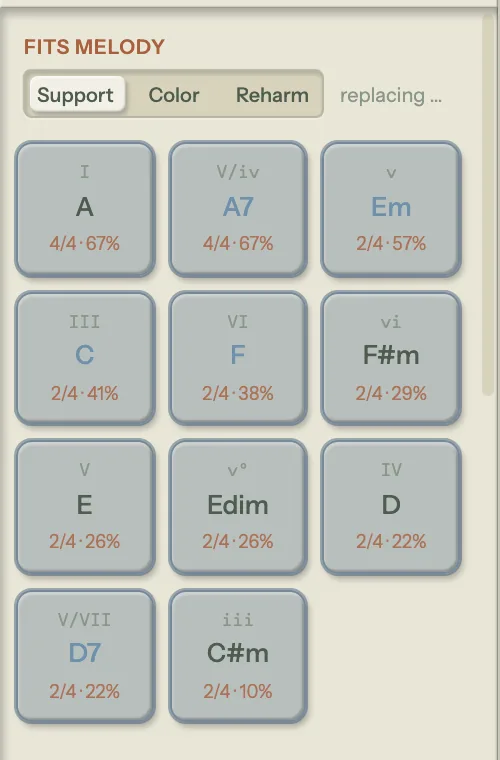
Which section leads depends on what's under the slot. When melody notes overlap it, a Fits Melody section ranks chords by how well their tones match those notes. When the slot has no melody over it, a Place or Replace section takes that spot instead, ranking chords by how naturally they connect to the surrounding chords: a shortlist of the workhorse moves plus a few borrowed colors, never a re-listing of the full palette below. Between them they answer the two questions that matter at any slot: what sounds good with the melody here? and what flows well in the progression?
Melody-fit scoring
Each melody-fit chip shows a score in the format 1/1 · 99%: one out of one melody notes in that beat range are chord tones, for a 99% fit score. The count is a plain note count and the percentage is weighted, so the two can legitimately disagree. A note matching as a ninth scores lower than the same note matching as the root.
Two things set that weighting. The melody role dial in the section header decides which degrees count for most, covered below. On top of that, each melody note carries a structural weight of its own: a long note on a downbeat counts for more than a passing eighth between beats. That second part is why the same three pitches can rank chords differently depending on the rhythm you gave them.
Hover a melody-fit chip for a detailed breakdown: which melody notes matched which chord tones, the progression context (if adjacency data is available), and a composite score explanation.
Melody-fit scoring updates live. Change a melody note at a beat and the chord rankings for that position reshuffle in real time. This is the mechanism behind the "everything talks to everything" behavior described in Chapter 4: the melody you wrote is actively shaping which chords the palette suggests.
Progression suggestions
The Place/Replace section ranks chords by weighted adjacency tables that model common progressions. Each scale degree has a list of weighted destinations. In a minor key, i tends toward iv (0.22), VII (0.18), and III (0.15). In a major key, I tends toward IV (0.22), V (0.20), and vi (0.18).
The ranking is context-aware: it considers both the chord before the target and the chord after it. The context label tells you exactly what's being evaluated: "C → ? between i and IV" means the palette is finding the best chord to sit between Am and D. Multi-chord patterns get additional boosts. A I-V sequence followed by a slot gets a strong boost for vi (the "Pop progression": I-V-vi-IV). A I-vi sequence boosts IV (the "50s progression": I-vi-IV-V).
Turnaround toggle
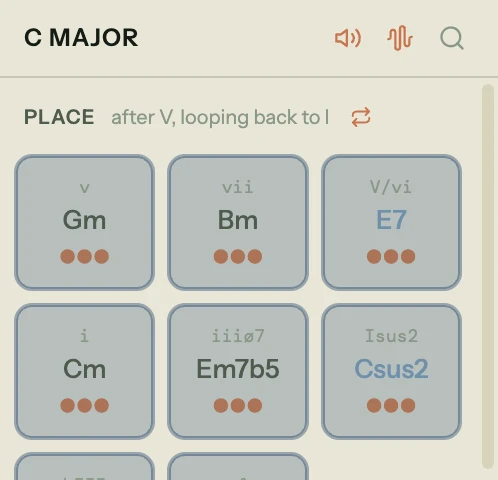
When you're placing or replacing a chord at the end of a section, a small loop icon appears next to the context label. Click it and the "chord after" target switches from whatever comes next (by default, the first chord of the next section) to the first chord of the current section. The context label updates to read something like "after V, looping back to I", and suggestions reshuffle to rank chords that lead naturally back to the top of the section: V7 turnarounds, ii-V cadences, secondary dominants of the section's tonic.
This is most useful when a verse or chorus repeats once before moving on, or when the section is the last one in the song and there's nothing to bridge into. The toggle is off by default and resets when you move to a different insertion point, so the standard "bridge to what's next" behavior stays the rule everywhere else.
The voicing dial: Triads · 7ths · Lush
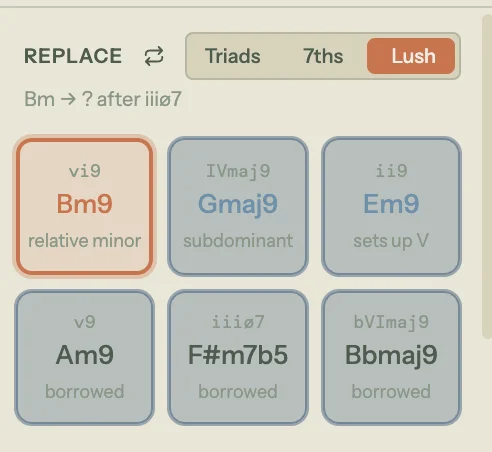
The suggestion engine picks which moves to offer. The voicing dial in the strip header picks how rich each one sounds. Triads keeps every pick plain. 7ths upgrades each pick to its natural seventh: majors take a maj7, minors take an m7, and the dominant takes a plain 7. Lush stacks ninths where the key allows and falls back where it doesn't: in C major, ii becomes Dm9 but iii stays Em7, because Em9 would reach outside the key. Borrowed chords take their idiomatic forms instead: bVII and bVI become major sevenths and ninths, and the minor iv becomes the classic m6.
The dial never changes which chords are suggested or how they rank: only the voicing. If you're auditioning a chip when you flip the level, the audition re-voices in place and replays, so you can A/B the same move as a plain triad, a seventh, or a ninth entirely by ear. The setting is remembered across sessions, and the same dial lives on the Suggested lane in the mobile app.
The melody role dial: Support · Color · Reharm
The Fits Melody header carries its own three-position dial, and it is not a second voicing dial. The voicing dial above re-voices a fixed set of picks and never moves the ranking. This one changes the question being asked, so different chords appear and the percentages recompute.
The question is what job your melody note is doing inside the chord. A single C can be the root of C, the third of A minor, the fifth of F, the seventh of Dm7, or the ninth of Bb. Each is a different answer to the same note, and which one you want is a matter of taste rather than something the app can work out for you.
Support wants the melody note to be a root, third, or fifth. The chord holds the note up, and you get plain triads plus the sevenths that are part of a chord's identity anyway. This is the folk, country, and straight-pop answer, and it is the default.
Color lets the note be a seventh, ninth, or sixth, coloring the chord instead of anchoring it. A melody D over a C chord becomes Cadd9 rather than pushing you toward D minor. Reach for it when the plain answer sounds too plain.
Reharm treats the note as an upper structure or a chromatic pivot. The pull toward in-key chords drops away, borrowed chords and secondary dominants climb the list, and a blue third stops being scored as a clash.
Because the criterion moves rather than the voicing, a chord's score always belongs to the chord you are looking at. Flipping the dial mid-audition re-resolves the same slot against the new ranking and replays it, so you can hear all three answers to one melody without moving your hands. The setting is remembered across sessions.
One thing worth knowing: a chord that leaves some of your melody notes uncovered is not a failure. A passing tone is meant to pass over the harmony rather than be absorbed into it, so a plain chord reading 2/3 is often exactly right. Support will sometimes offer a shorter list than the richer roles for the same reason. It only shows chords that genuinely contain one of your notes instead of padding the list out.
The Bass Line strip
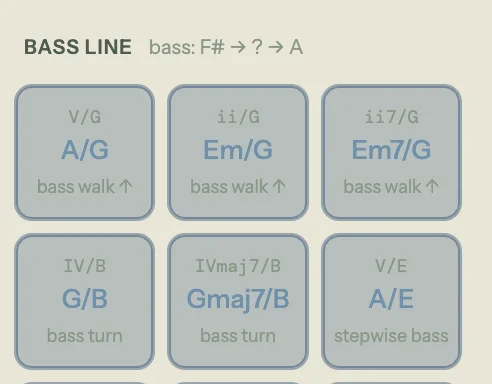
Below the suggestions sits a Bass Line section of slash chords: inversions and over-bass forms whose bass note walks by step from the previous chord's bass, and, when a chord follows the slot, on into the next one. The header hint names the walk being completed ("bass: F# → ? → A"), and each chip is labeled with its motion: an ascending or descending bass walk, a bass turn that steps away and comes back, or a one-sided stepwise bass. Candidates are filtered to shapes a guitarist can actually finger, and the same forms are the bread and butter of a pianist's left hand.
Reason labels
Every suggestion chip carries a compact label naming the move it represents: functional roles like subdominant, relative minor, and sets up V; named patterns like ii–V–I and deceptive; borrowed for modal-interchange colors; and resolution arrows like → vi on secondary dominants. The label is the why at a glance: hover the chip for the full story.
Suggestion tooltips
Hover any suggestion chip to see a tooltip explaining the ranking. The tooltip shows directional arrows: "← from Am" explains why this chord follows the preceding chord, and "→ to F" explains why it leads well into the following chord. When a multi-chord pattern triggered a boost, the tooltip names it ("Pop progression", "50s progression", "Andalusian cadence", and others).
Borrowed Notes: a chord that moves one melody note
A borrowed chord often clashes with one melody note by a half step. Under a melody A in C major, Fm grinds against its own A♭, so Fits Melody leaves it out. Songwriters keep that chord all the time and sing the note a half step lower instead: the minor iv of a hundred ballads. Borrowed Notes lets the palette offer that move.
Switch it on in Settings, under Input: Borrowed Notes, with the line chords tagged … change a note under it. In the desktop app it's an item in the Settings menu. It's off by default and saved on your device. Off, nothing a chord does ever changes your melody. It's in the web app, the desktop app and the plugin; the iPad app gets it with its next update.
On, a chord that would move a note carries a small tag in the top-right corner of its chip: a dashed outline, a hook for the way the note bends, and the new note (A♭). Hover the chip with a mouse and the same mark appears on the word's note badge, and the section piano roll, if it's open, draws the note at its new pitch with a dashed line where it was, so you can see which note the chord changes before you try it. A Fits Melody chip's tooltip adds a Melody line saying which note moves, from what to what, and where it goes next.
Try the chord and the moved note sounds with it, and the word's note badge shows the new pitch with the same dashed edge and hook. Keep it and the chord and the moved note are written together, as one undo step. It works the same wherever the chord comes from: any tab of the palette, the chord search, a number key, a MIDI chord, or a chord dragged onto the lane. Fits Melody also adds a few chords that only fit once the note moves.
A small set of rules keeps the move a color rather than a wrong note:
- Same letter, one half step. A becomes A♭, never G♯. The tune keeps its shape, its rhythm and its words; one note changes color.
- Only the notes the modes disagree about. Lowered toward the parallel minor (♭3, ♭6, ♭7, and ♭2 for the Neapolitan), raised a half step as a leading tone into the next note, or, in a minor key, the parallel major's brighter 3 and 6.
- The note goes where it leans. A lowered note steps down, a raised one steps up by a half step, or the note ends the phrase and is held.
- One pitch per chord. If that pitch is sung more than once under the chord, every one of them moves, and the chord must clash with nothing else in the melody.
Borrowed Notes needs a key to borrow from, so a section in Wander mode gets no moves. To take back a move you kept, undo it.
9.4 Auto Chords (one-click harmonize)
The Fits Melody column ranks chords for a single beat. Auto Chords runs the same melody-fit logic across an entire section and produces a complete progression in one click. It reads the same structural weighting, so the rhythm of your melody shapes the result, and it follows the same Support / Color / Reharm dial: the preview bar carries its own copy, and moving either one re-fits the progression.
The trigger is an Auto Chords button in the section header, after the double and loop icons and before the right-side settings cluster. The button only appears when the section has enough melody notes on the grid to harmonize (a low single-digit minimum). If a preview is already open for that section, the button hides until you accept or cancel.

The preview bar
Clicking Auto Chords doesn't write anything to the grid. It opens a dashed-outline ghost progression in the chord lane and a preview action bar that mounts directly above the section's first line. The bar shows:
- Auto-chord preview: a label so you know what mode you're in.
- The inferred key the suggestions were ranked against (e.g. Sounds like A minor). Detected from the melody itself when the section has no key override.
- A flavor slider with three positions:
- Held: long-held chords, up to two bars each, never crossing a line break. Good for ballads and sparse arrangements.
- Steady: one chord per bar (or matching the section's natural pulse). The default.
- Active: up to two chords per bar, splitting a bar at its midpoint only where the melody supports two distinct chords. In an odd or short meter it falls back to Steady.
- Switching flavor re-fits the chords across the new spans, so the picks can change along with the pacing. They are drawn from the same palette either way, and the result isn't randomized: it's deterministic given the same melody, key, and flavor.
- A Support / Color / Reharm dial, the same setting as the Fits Melody strip. The flavor slider decides how often the chords change; this decides which chords they are. Reharm is the one to reach for when a melody that sits on one note keeps getting the same chord for four bars.
- Keep my chords, shown when the lane already has chords in it. On, the existing blocks are held in place as locked anchors, drawn in the ghost with a lock, and only the gaps are harmonized. The bars either side of a kept chord are chosen with it in view, so the fill leads into and out of what you already had. Off, the whole lane is regenerated.
- Regenerate (the circular-arrow button): show the next-best progression. Each press steps to another complete progression for the melody, ranked best fit first, and after the last one it comes back round to the best fit, so one you passed is only a few presses away. A label beside the button says where you are (2nd best, 3rd best, and so on, up to six), and its tooltip says so when no other progression fits the melody. Changing the flavor or the Support / Color / Reharm dial starts again from the best fit. Chords you locked stay where they are on every one.
- Cancel (the ×): discard the preview and leave the lane untouched.
- Accept: commit the ghost chords as real blocks. When the lane already has chords in it, the button reads Replace N so you know how many existing blocks the accept will overwrite.

The preview follows your notes
You can keep working on the melody while the preview is open. Move, re-pitch, add or remove a note and the progression re-fits to the new melody a moment later (while you're still dragging, it waits until you let go). Bars you locked stay as they are, and so do the chords held by Keep my chords. Regenerate's place holds too, unless the new melody has fewer progressions than that, which sends it back to the best fit. Typing a word's letters isn't a melody change, so it re-fits nothing.
Only the preview follows. Once you accept, the chords are blocks you own, and no later note edit rewrites them.
Auditioning and swapping alternatives in the ghost
While the preview is open, the section's existing chord blocks are hidden so the dashed ghost progression has the lane to itself. The ghost blocks themselves are interactive:
- Hover a ghost block to open a popover with the chord name, a play button to audition it, a lock toggle, and a ranked list of alternatives for that beat range. The audition uses the same chord-preview path as palette chips, so it respects your guitar voicing or piano voice-leading settings.
- Click an alternative in the popover to swap the ghost to that chord. A chord you chose is a decision, so the swap locks the bar, and the bars after it are re-chosen with your chord as the one they follow. The chord it replaced heads the alternatives list, so the swap can be undone from the same place. Each alternative has its own play button so you can hear it before picking.
- Type a chord in the popover's field for anything the engine did not offer. Typing a root ("C") lists every quality on it with the key's own first, a quality ("m7") lists it on every root, and Enter writes the first match. A typed chord locks the bar the same way a swap does.
- Click the ghost block itself to lock it (or click the lock toggle in the popover) so Regenerate keeps it in place on every progression it steps through. Double-click is a shortcut to audition the current chord.
The chord lane's normal cell-hover, right-click context menu, and the empty-state hint all go inert while a preview is showing. The preview bar is the canonical action surface; the lane is read-only until you accept or cancel.
How accept interacts with existing chords
When you click Accept (or Replace N) on a section that already had chord blocks, every existing block is replaced atomically as a single undo step. With Keep my chords on, the kept blocks stay exactly as they were, voicings included, and only the gaps are written. Press Cmd+Z once if you don't like the result and you're back to the chords you had before the preview ran.
9.5 Extensions
Every chord starts as a triad. To add color, open the extension popover by clicking the three-dot button (⋯) on any chord chip in the palette or on any chord block on the timeline.
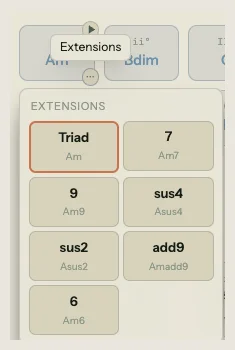
The popover shows a grid of extension buttons. The available extensions depend on the chord quality:
- Major chords get: 7, maj7, 9, sus4, sus2, add9, 6
- Minor chords get: 7, 9, add9, 6 (sus chords aren't offered on minor: sus chords replace the 3rd, which is what makes a chord minor, so "minor sus" collapses to a plain sus chord)
- Diminished chords get: 7 only
Each button shows the resulting chord name below it (e.g., clicking "7" on an Am chip shows "Am7"), so you can see the full name before committing.
Click an extension to apply it. The chord updates everywhere: on the timeline, in the palette, and in the voicing display. The extension popover stays open so you can compare extensions quickly.
On a chord block, on the timeline or in Sheet view, the grid starts with Note, which turns the chord into its root as a single note (section 9.7).
9.6 Voicings
A chord name like "Am7" doesn't specify which octave, which inversion, or which fingering to use. The voicing controls let you make those choices.
Guitar voicings
When the instrument toggle in Settings is set to Guitar, chord blocks show a mini fretboard diagram: six horizontal lines representing the strings (E-A-D-G-B-E), with dots marking fretted positions, open-string markers, and X symbols for muted strings.
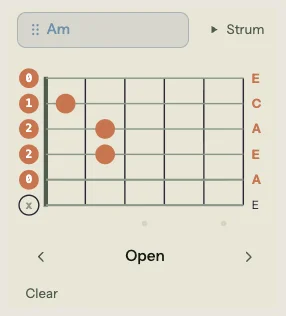
Song Cage ships with a database of real guitar chord shapes. When you place a chord, it picks a default voicing. To browse alternatives, hover the chord block and click its ⋯ button (or the mini diagram above it) to open the extensions and voicing popover, then scroll through the Voicing options.
If you've set a capo (in Settings), all guitar voicings transpose automatically. The fretboard diagram shows the shape relative to the capo position, and the sounding pitch stays correct.
Piano voicings
When the instrument toggle is set to Piano, chord blocks show a mini keyboard with highlighted chord tones.
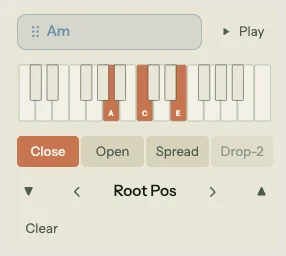
Piano voicings have two axes of variation:
Voicing type controls the spread of the notes:
- Close: all notes within one octave, ascending
- Open: second-from-bottom note moved up an octave
- Spread: root in octave 3, remaining notes in octave 4 and above
- Drop-2: second-from-top note dropped down an octave (available for four-note chords and larger)
Inversion controls which note is in the bass:
- Root position
- 1st inversion (third in bass)
- 2nd inversion (fifth in bass)
- 3rd inversion (seventh in bass, for seventh chords)
An octave offset control (double-chevron up and down buttons on the outer flanks) shifts the entire voicing up or down by one or two octaves. The double chevrons read as a "bigger jump" so they stay distinct from the single-chevron voicing stepper next to the label.
Voicing carousel
The voicing carousel sits next to the chord label as a compact up/down stepper: the up chevron picks the next voicing, the down chevron picks the previous. The direction matches the keyboard shortcut (Up/Down) so you can cycle from mouse or keyboard without re-learning the mapping. Clicking the label itself opens a Browse all voicings popup that displays every available voicing in a grid, grouped by type, each rendered as a mini keyboard. Click any voicing to select it.
9.7 Chord shapes in guitar tab
With the guitar instrument, the section piano roll docked under the timeline can show the section as tab. Click Guitar tab at the bottom of the timeline, or press Shift+P. The chord names run along the top, and under them a six-string staff (high e on top, low E on bottom) holds each chord's shape. The melody's own staff sits below it (Chapter 10).
Each chord shows as a stack of fret numbers at the beat it starts, drawn from the chord's stored guitar voicing. The dock's header shows the tuning name (when it isn't standard) and the capo (when one is set).
Editing an existing voicing
Click a string at any beat inside an existing chord block, then type a fret number. The voicing updates live, and Song Cage re-runs chord detection on the new shape: if the fingering resolves to a different chord (say, you turn an Am into an Am7 by adding a fret), the chord lane's label updates with it. If detection can't classify the partial shape yet, the existing label is kept until you finish typing.
Multi-digit frets work the way you'd expect: type 1 then 2 for fret 12. Press X to mute a string. The cursor sits as a stripe across the active string, with the typed digit shown in orange until it commits.
Composing a new chord by typing frets
Click an empty beat (one with no chord block at it) to start a compose buffer. The cursor sits at that beat × string, and any frets you type are sketched in orange across the staff. Move between strings with Arrow Up / Down, type a fret per string, then press Enter to commit. The buffer lands as a new chord block with the auto-detected name and a duration matching the current snap (one beat at 1/4, half a beat at 1/8, and so on). Resize it on the chord lane afterward if you want it longer.
The compose buffer survives navigation: arrowing one beat over while the buffer is at the original beat commits the buffer first, so partial sketches don't get stranded. Click somewhere else (or press Escape) to drop the buffer without committing.
Single notes
Type a fret on just one string at an empty beat and you get a single note rather than a chord. The chord lane names it by its note (E, say) with Note where a chord shows its voicing name, and leaves off the Roman numeral, since one note isn't a chord. It plays once and holds for the length of the block, whatever the rhythm pattern (Chapter 13), and on piano it plays that one note. Mute strings on an existing chord until one is left and it becomes a note the same way; add a string back and it's a chord again. Changing the capo or the tuning keeps it the same note, fingered on whichever string now reaches it most comfortably.
Without a guitar, open a chord block's extension popover (section 9.5) and pick Note, the first key in the grid. The chord becomes its root on its own, played where the chord's piano voicing had its root (or the nearest octave a guitar string can play), and the voicings below give way to an octave stepper: − and + move the note down or up an octave, with the note and its octave (E3, say) shown between them. Pick Triad or any extension to turn it back into a chord.
Cursor and navigation
While the cursor is on the staff, the keyboard takes over:
- Arrow Up / Down moves between strings.
- Arrow Left / Right moves between beats at the current snap.
- Tab / Enter advances and commits any in-flight digits.
- Backspace clears the digit buffer, then mutes the string on a second press.
- Escape dismisses the cursor and discards any compose buffer.
Clicking outside the staves clears the cursor, and so does switching back to Roll. The melody's staff works the same way: see Chapter 10's melody in guitar tab section.
9.8 Editing chords on the grid
Once chords are on the timeline, you can reshape the progression directly.
Moving
Drag a chord block horizontally to reposition it within its section. The block snaps to the beat grid. To move a chord to a different section, drag it across the section boundary.
To move multiple chords at once, select them first (click one, then Shift-click or Cmd-click others, or Cmd+A to select all chords in the active section), then drag. All selected blocks move together by the same beat delta.
To nudge from the keyboard instead, select one or more chords and press Alt+Left or Alt+Right (Option on a Mac). The selection moves one grid space, and a chord sitting between grid lines lands on the nearest line in that direction first. Any selected lyric blocks move with it, and each nudge is one undo step.
Resizing
Drag the right edge of a chord block to change its duration. Drag the left edge to change where it starts (the duration adjusts to compensate). Both edges snap to the beat grid.
Double-click an edge instead and the block fills the gap on that side by itself, out to the neighboring chord or to the end of the line, whichever comes first. It stops at the line, not the section, so on a section that wraps across several lines a double-click can't reach past the end of the row you're looking at.
Rolling boundaries
When two chord blocks sit directly next to each other, you can drag the boundary between them. This is a roll edit: one chord gets shorter, the other gets longer, and the transition point moves. No gap is created.
Copy, cut, paste
Standard shortcuts work on selected chord blocks:
- Cmd+C copies
- Cmd+X cuts
- Cmd+V pastes at the current pending target or playhead position
Pasted chords bring their voicings with them. If they run past the end of the section, it grows by whole lines to fit them, and one undo takes back the lines and the chords together.
Deleting
Press Delete or Backspace to remove selected chord blocks.
Right-click menu
Right-click any chord block for a context menu with Copy, Cut, Paste, Delete, Smooth Voicings (see below), and a Chord Diagrams toggle that shows or hides the mini fretboard/keyboard display on all chord blocks, the same as View > Chord Diagrams on Hover.
9.9 Voice leading
When you build a progression one chord at a time, each chord gets an independent voicing. That's fine for exploring, but if you play the progression back on piano, the jumps between voicings can sound choppy: the right hand leaps around the keyboard instead of moving smoothly from one chord to the next.
The Smooth Voicings command fixes this. Right-click any chord block and choose Smooth Voicings to smooth every chord in the song, in the order they play. To smooth only part of the song, select two or more chord blocks first, then right-click one of them. The menu says which it will do: "(whole song)" or the number of selected chords.
Song Cage runs a Viterbi optimization that finds the voicing sequence with the least total hand movement across those chords. The first chord's voicing stays fixed as an anchor; subsequent chords switch to whichever inversion and voicing type minimizes the distance from the previous chord.
After optimization, a brief message above the chord shows the improvement: something like "42 → 18 semitones," meaning the total voice-leading distance dropped from 42 semitones to 18. If you don't like the result, press Cmd+Z to put the old voicings back.
Smooth Voicings only affects piano voicings. Guitar voicings are physical shapes on a fretboard and don't have the same invertibility, so the command is greyed out, with "(switch to Piano)" beside it, when the instrument toggle is set to Guitar. Switch the toggle to Piano to use it.
9.10 Chord shortcuts reference
| Action | Shortcut |
|---|---|
| Delete selected chords | Delete / Backspace |
| Copy | Cmd+C |
| Cut | Cmd+X |
| Paste | Cmd+V |
| Select all chords in section | Cmd+A |
| Nudge selected chords one grid space | Alt + Left / Right arrow |
| Open chord search | / |
| Try the top suggestion on the selected chord | Enter (or double-click the chord) |
| Step palette ±1 (audition) | Left / Right arrow |
| Move to chord above / below in grid (audition) | Up / Down arrow |
| Cycle extensions (audition) | Shift + Left / Right arrow |
| Cycle voicings (audition) | Shift + Up / Down arrow |
| Commit audition chord | Enter |
| Cancel audition | Escape |
That covers the chord palette and the mechanics of building a progression. The next chapter covers the other half of the harmony layer: writing melody, and how melody notes and chord suggestions feed into each other.