Every lyric block can carry a melody note. Click to play a pitch, type it as a number of the key or on the home row with Musical Typing, type frets on guitar tab, hold a button and sing one in, or record a take and detect a whole phrase. The note sticks to the syllable wherever it moves.
What you'll learn
- How melody notes attach to lyric blocks and syllable segments
- How to enter notes with the inline piano, the number keys, Musical Typing, a MIDI keyboard, guitar tab, or your voice
- How to sing a single note straight onto a syllable, and when to record a take instead
- How Follow Chord mode remaps your keyboard to chord tones
- How to nudge, navigate, and delete notes after they're placed
- How to give one syllable more than one note
- How to edit a section's melody in the piano roll under the timeline
- How pitch detection turns a sung take into notes you can fix in a piano roll and drag onto the timeline
- How the melody voices, including the Singer that sings your lyrics, shape melody playback
- How Melody Ideas makes new lines out of a section's melody, each kept as an alt
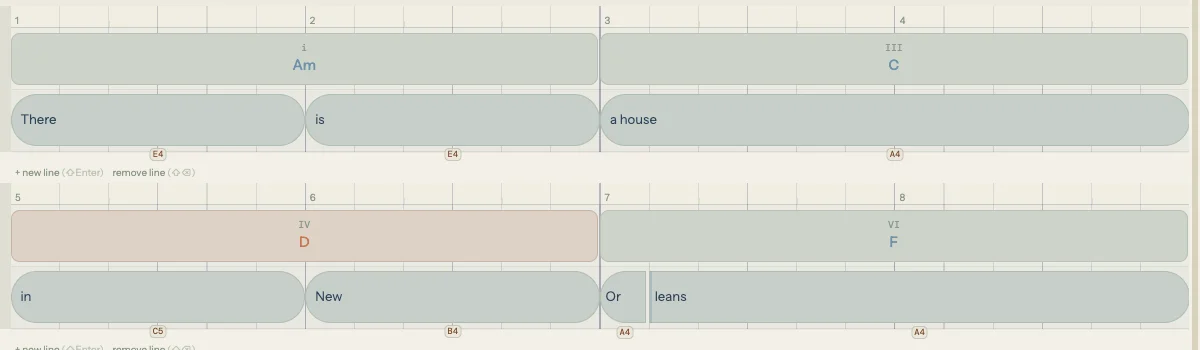
Chapter 9 covered building chord progressions. This chapter covers the other half of the harmony layer: the melody notes that live inside your lyric blocks. Every method of input described here produces the same result, a pitch label sitting on a syllable, so you can mix and match freely. Play the first phrase on the piano, type the second with Musical Typing, and sing the bridge.
10.1 How melody notes work
To add a melody note, three quick ways:
- Click a lyric block to open the inline piano, then click any key to set the pitch, or hold Hold to sing underneath it (or just hold M) and sing the note. This is the most common path, walked through in detail in §10.2.
- Single-click empty space in the lyric lane to create a melody-only block (a note on the grid with no text). Set its pitch from the piano that opens.
- Double-click empty space instead if you want a lyric block.
Other input methods (singing a note in, Musical Typing, a MIDI keyboard, Follow Chord, guitar tab, recording a take and detecting it) all produce the same result (a pitch label on a syllable) and are covered in §10.2 onward.
The rest of this section is background on the data model and how notes display on the timeline.
A melody note is a pitch attached to a syllable segment inside a lyric block. If a block has no syllable splits, it has one segment and one note slot. If a block has two splits, it has three segments and three note slots. Each slot holds either a pitch (like "E4" or "A4") or nothing.
A syllable is not limited to one note, though. Press N and the syllable you're on gains a second slot without the word being cut: "run" stays spelled "run" and holds two pitches, or three. That's §10.6.
On the timeline, melody notes appear as small pitch badges below each lyric block showing the note name and octave. These badges move with the block when you drag it, and they follow syllable splits when you adjust dividers.
Melody notes are optional. A block can hold lyrics with no melody, a melody with no lyrics (a melody-only block), or both.
10.2 The inline piano
The simplest way to add a melody note is to click a lyric block and play it on the inline piano.
Select a lyric block by clicking it. A small piano keyboard appears as a floating popover, centered on the block and opening just below it, so the chord lane sitting above the lyric row stays readable. (Near the bottom of the window it flips above instead.) The keyboard spans two octaves and shows both white and black keys. Click any key to set that pitch on the current syllable segment. The note previews through the Mellotron synth immediately.
The keys belonging to the chord sounding under this syllable light up, and each lit key is labelled with what it's doing in that chord: R for the root, ♭3 or 3, 5, ♭7 and so on. The key you pick gets a label too, even when it isn't in the chord, so you can see at a glance whether the note you're about to pick is a chord tone or a passing note, without looking away from the keys.
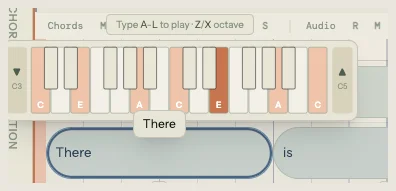
If the block has syllable splits, use Left/Right arrow keys to move the cursor between segments. Each segment highlights as you navigate, and clicking a piano key sets the pitch for whichever segment is active.
The piano auto-shifts its visible octave range when you click a note near the edges. To jump octaves manually, use the Z and X keys (down and up) or the octave buttons on either side of the keyboard.
Every pick is written as you make it, so there is nothing to confirm. Press Escape, or click somewhere else on the timeline, to deselect the block and close the piano; the note stays, and Cmd/Ctrl+Z takes it back. Press Enter instead to type the block's lyric.
Singing a note in
Under the keyboard is a Hold to sing button. Hold it, sing the note you want, and let go: the pitch you sang lands on the selected segment. It's the fastest way in when you can hear the note but would have to hunt for it on the keys.
Holding the M key does exactly the same thing, which is usually quicker when you're already typing notes in and don't want to reach for the mouse. Hold M, sing, let go.
While you hold, the button shows the note it's hearing, and it keeps showing that note if you stop humming before you let go. What the button is showing is what a release will write, so it can't name a note and then refuse to place it. Let go and it writes that pitch and plays it back.
Then the cursor steps on to the next syllable, or the next empty grid cell, without playing what's there. The next hold fills the next note, so you can sing a whole line one note at a time without reaching for the keyboard.
Nothing heard means exactly that: nothing was heard at any point in the hold. An empty room, a muted input, or a press with no voice behind it. If the button read a note to you, that note lands.
A few things that help:
- Hold a beat longer than feels necessary. A short jab is less reliable than a sustained note; give it a clear half-second of tone.
- Sing a vowel, not a word. "Ah" or "oo" reads more cleanly than a consonant.
- A close microphone helps a lot, especially low in your range. A laptop's built-in mic thins out the bottom of a bass register, so low notes are where an external mic makes the most difference.
Next to the button is an oct control. It shifts every sung note by whole octaves, which is the fix when your comfortable range sits below the line you're writing: set it once and everything you sing lands where you meant it, with the intervals you sang left intact. It stays at 0 unless you change it, and lights up when it's doing something.
Each hold is one note. To capture a whole phrase in one pass, record a take and detect the notes from it instead: that's §10.7.
The button is there while Sing to Pitch is on in Settings (in the menu bar at the top of the editor). It's on unless you turn it off.
Singing in needs a microphone, so in the plugin it depends on your host. Where the DAW allows microphone access the button is there; where it doesn't, it's hidden, and the keyboard, Musical Typing, or the tab lane get you the same note.
Typing notes by number
Once your song has a key, the number keys type the notes of that key. With the piano open, 1 is the key's root, 2 to 7 climb the scale from there, and 8 is the root an octave up. In A major, 1 is A, 3 is C#, 5 is E. Like a sung note, each one lands on the selected syllable and the cursor steps on to the next, so you can type a whole line as numbers: 5 5 6 5 1 7.
Hold Shift to borrow the note from the parallel key: in a major key, Shift+3 is the flat 3, and Shift+6 and Shift+7 the flat 6 and 7. It's the same thing Shift does when you type chords by number (§18.5).
The numbers follow the piano's octave window, so Z and X move them up and down along with it. A section with its own key uses that key.
With no key yet (the Wander palette), the numbers have nothing to count from, so they say so instead of guessing. Place a couple of chords and pick a key from Sounds like, or switch on Musical Typing (§10.3) to type notes with letters.
10.3 Musical Typing
For faster input, toggle Musical Typing by pressing K. A thin indicator bar appears showing "Musical Typing: On" with the current octave number.
Musical Typing maps your QWERTY keyboard to a chromatic scale, matching the layout used by GarageBand and other DAWs. The home row plays naturals, and the row above fills in the sharps:
| A | W | S | E | D | F | T | G | Y | H | U | J | K | L | |
|---|---|---|---|---|---|---|---|---|---|---|---|---|---|---|
| Note | C | C# | D | D# | E | F | F# | G | G# | A | A# | B | C | D |
Z shifts down one octave (minimum 1), X shifts up one octave (maximum 7). The default octave is 4, so pressing A plays C4.
Musical Typing works in two contexts:
- With the inline piano open, keys play through the piano and set the note on the active syllable segment. The cursor then steps on to the next syllable (or the next empty grid cell) without playing what's there, so you can type a line of melody straight through. With Musical Typing off, letters don't set notes here, so selecting a word and typing never writes pitches by accident; turn it on first (K with nothing selected, or from Settings), or use the number keys (§10.2). With a word selected, K is a note key like the rest of the row, so it doesn't switch Musical Typing on.
- During recording, keys create notes on the timeline at the playhead position, quantized to the current snap division.
While Musical Typing is on, the mapped keys are consumed for note input. Other keyboard shortcuts still work through modifier keys (Cmd, Ctrl). Once it's on, K plays a note, so turn it off with the ✕ on the keyboard strip along the bottom of the window, or from Settings. Song Cage remembers the setting, so it's still on the next time you open the app.
A MIDI keyboard
In the desktop app and the plugin, a MIDI keyboard works the same way. The MIDI Keyboard row in Settings turns it on or off; it's on by default. The desktop app lists your MIDI devices there so you can pick one. In the plugin, Song Cage hears whatever MIDI your DAW sends to its track, and the row reads From DAW.
With a syllable selected, or the dashed cursor on an empty cell, each note you play fills that slot and the cursor steps on to the next one without playing what's there. Play a phrase and you fill a phrase of syllables. With nothing selected, the keyboard just plays, and while you record with Melody picked, what you play lands on the timeline the way Musical Typing does. Play a chord while a ghost chord slot is waiting in the chord lane (Chapter 9) and Song Cage names it and places it there instead.
The web app has no MIDI input.
10.4 Follow Chord
Follow Chord remaps the home row to chord tones instead of a chromatic scale. Toggle it in Settings: open it from the menu bar, or right-click the lyric lane and choose Melody Settings..., which opens the same panel.
When Follow Chord is active:
- Song Cage finds the chord at the current playhead position (or the selected block's beat).
- It builds a pool of 9 ascending chord tones starting from the chord root.
- Keys A through L map to those 9 tones in order. A is the root, S is the next chord tone up, and so on.
The inline piano switches from a full two-octave keyboard to a chord tone strip: a row of buttons showing only the available chord tones. The strip updates automatically as the playhead crosses chord boundaries.
Follow Chord is useful when you want every note to fit the harmony without thinking about which notes are in the chord. It's especially powerful during recording: play along with the accompaniment and every note you hit is guaranteed to be a chord tone.
Z and X still shift octaves in Follow Chord mode.
10.5 The melody in guitar tab
If you read guitar tab faster than staff notation, write the melody in tab. Click Guitar tab at the bottom of the timeline, beside Piano roll, or press Shift+P. The button is there when your instrument is guitar. It opens the same dock as the section piano roll (§10.6), drawn as tab: the chord names, the chord shapes on a six-string staff (Chapter 9), the words, and under them the melody on a second six-string staff, high e on top and low E on the bottom, with the string names down the left. It zooms, scrolls and follows the playhead like the roll, and it shows the same section. Click Piano roll (or press P) to switch to the roll, or click Guitar tab again to close the dock. The dock's header has a Roll | Tab switch too.
Existing melody notes show up as fret numbers on whichever string the pitch sits most comfortably on. Fret positions follow the song's tuning, and the dock's header shows the tuning name (when it isn't standard) and the capo (when one is set).
To place or change a note, click a beat at the string you want, then type the fret number. Multi-digit frets work the way you'd expect: type 1 then 2 for fret 12. The cursor sits on the cell as a stripe across the active string, and the typed digit shows in orange until you commit it.
Once the cursor is on the staff, the keyboard takes over:
- Arrow Up / Down moves the cursor between strings.
- Arrow Left / Right moves the cursor between beats at the current snap.
- Tab or Enter advances to the next beat (commits any in-flight digits).
- Backspace clears the digit buffer, then clears the note on a second press.
- Escape dismisses the cursor.
If the cell sits inside a worded lyric block, where the fret lands depends on where the cursor is. On the start of a syllable it changes that syllable's note, which is what a cursor parked on an existing note should do. Part-way through one, it opens a new note there instead: the cursor on the staff moves by grid rather than by syllable, so it can already stand between notes, and landing there used to quietly overwrite the syllable's pitch. The word keeps its spelling and both notes survive. See §10.6.
If the cell is empty or sits inside a melody-only block, a snap-sized melody-only block is added at the cursor and any wider block that used to cover the cell is trimmed to make room. This is the same DAW-style cell-replace behavior the rest of the timeline uses.
The pitch shown on the staff and the pitch played on the synth are derived from the (string, fret) pair, so picking a different string for the same pitch is a stylistic choice about where you'd finger it. The choice is saved with the note and survives reload.
10.6 Editing notes
Nudging pitch
With a lyric block selected, press Arrow Up or Arrow Down to nudge the melody note by one scale degree. The nudge respects the current key and mode, so in C major, nudging up from E4 lands on F4 (not E#4). If Follow Chord is active, the nudge moves to the next chord tone instead of the next scale degree.
Hold Shift and the same keys move the note a whole octave. That is the fix when the line is right but sits in the wrong part of your range.
Select several blocks (shift-click, or drag a marquee across them) and both moves apply to every note in the selection at once. A plain nudge still steps each note against the chord under its own beat, so lifting a whole line keeps every note in the harmony it was written over. If any note would run off the end of the piano, nothing moves at all, so a phrase never comes back with some notes shifted and the rest left behind.
Each nudge plays the new pitch through the synth so you hear the change immediately. A move across several blocks stays silent: a dozen pitches at once tells you nothing.
Navigating between notes
Arrow Left and Arrow Right move the cursor through every note slot on the timeline: syllable segments within a block, then grid cells at the current snap across empty space. Each note plays as the cursor lands on it, so you can arrow through a phrase and hear the melody in sequence. Empty cells are silent; the silence is the rest.
When the cursor lands on an empty cell it shows as a dashed outline, and the piano follows it. Nothing is written to the song while you pass through: arrow away and the cell is exactly as empty as before. To place a note there, press Arrow Up or Arrow Down (the note starts one scale step from your previous melody note, in the direction you pressed) or click the piano. The note appears on the grid and stays selected, so further presses nudge it into place. Typing it as a number (or on the home row with Musical Typing on), singing it, or playing it on a MIDI keyboard places it too, and moves the cursor on to the next cell, ready for the next note. Press Enter on an empty cell to type a lyric there instead, and Escape to dismiss the cursor.
Deleting hands the cell straight back to the cursor. Place a note, decide it's wrong, press Backspace, and the dashed outline reappears on the cell the note just left, so the next arrow press carries on from there instead of sending you back to the mouse.
Tab and Shift+Tab hop block-to-block, skipping over rests, when you want the coarse jump rather than the cell-by-cell walk.
To move the note itself rather than the cursor, hold Alt (Option on a Mac) and press Arrow Left or Arrow Right. The selected blocks move one grid space earlier or later, together and as one undo step. If the first of them sits between two grid lines, it goes to the next line in that direction first.
Giving one syllable more than one note
Sometimes a syllable is sung across two or three pitches. A held vowel at the end of a line, a little turn on the way into the next word: one word, several notes.
Press N with a syllable selected and it makes room. The syllable's time halves onto the next grid line and the cursor lands on the new, empty slot, so the very next thing you play fills it: a piano key, a number key, a home-row letter with Musical Typing on, a note on your MIDI keyboard, or M and your voice. Press N again for a third note.
The word is never re-spelled. The new slot carries a pitch and no letters, so "running" stays "run-ning" rather than becoming "run / ni / ng", and the syllable's letters stretch across the whole run so it still reads as one word. On the timeline the extra notes sit inside the word with a faint dashed seam between them and their own pitch badges underneath.
There are two other ways to the same thing. The pitch popup has a Note button beside Hold to sing, and right-clicking a syllable offers Add note to this syllable. Both go quiet when the syllable is already as short as the grid allows, since there's no line left to divide it on. Drop to a finer snap division first if you need one more.
The new note takes its time from the syllable rather than lengthening the word, so nothing after it moves. If the split lands wrong, drag the dashed seam to shift where one note ends and the next begins.
To take a note back off, hover the dashed seam and click the × above it. The note goes and its time returns to the syllable it came from.
Deleting a note
Press Delete or Backspace with a syllable segment selected to clear its note. The segment keeps its lyric text; only the pitch is removed. Backspace is the key people reach for to undo a note they just placed, so the first press takes the note and leaves the word: press it again if you did mean the word too.
A note with no word under it has nothing left to keep, so it goes on the first press, and the dashed cursor takes its cell, ready for the pitch you actually wanted.
The section piano roll
In Timeline view, a piano roll for the section you're working on is docked under the timeline, the way a DAW docks its note editor under the arrangement. It starts closed: click Piano roll at the bottom of the timeline to open it, and again to hide it. Drag its top edge to make it taller or shorter. Song Cage remembers whether it was open and how tall it was. The roll is in the web app, the desktop app and the plugin, but not in the phone layout.
It shows one section at a time: the one you last clicked on the timeline, or the one the melody cursor is in. While the song plays, the roll follows the playhead from section to section, unless your last click was in the roll. To look at another section, pick it from the section name in the roll's header, which also shows the key, the time signature and the grid size.
Every syllable that has a pitch is a note on its row, with the syllable written inside when there's room. Above the notes, one row shows the chords and another shows the words, so you can read what each note is sung on and against. A word with no note yet is drawn fainter; click it to select it. The note names down the left side follow the key: the home note is bold and notes outside the key are dimmed. The rows are shaded like piano keys, so you can count an interval off the stripes. A bar line is a single line, with bar numbers along the top. Where the timeline starts a new line, the roll draws a double line and tags it in the ruler (Line 2, Line 3), and where a lyric line ends inside one of those lines, it draws a dashed one.
The roll and the timeline share one selection and one undo history. Select a note in the roll and its word is selected on the timeline, and each gesture below is one step for Cmd/Ctrl+Z.
- Click a note to select it and hear it. Shift-click selects a run, Cmd/Ctrl-click adds or removes one note, and dragging across empty space selects every note the box touches. A selected note gets a heavier outline.
- Drag a note up or down to change its pitch, or sideways to move it in time (hold Shift to keep the pitch while you do). A word moves as a whole, so dragging one syllable sideways carries the rest of its word. Sideways moves are magnetic: the note follows your hand between the grid lines, and a line takes it once it comes within a sixteenth note, marked by a line through the notes while it holds. On an eighth-note grid or finer that pulls every position onto a line; on a quarter-note grid or coarser there's still room to leave a note off the grid on purpose. Hold Alt (Option on a Mac) to move it off the grid. A word moved onto another trims or replaces whatever it lands on, as a drag on the timeline does.
- Drag the end of a note. At the outside of a word this lengthens or shortens the word, stopping at the words either side. Between two syllables it moves the divider, giving time to one syllable and taking it from the other.
- Double-click on any row within a syllable's time to give that syllable the pitch of the row. Where there's no word, a double-click adds a note one grid space long (a melody-only block on the timeline); keep holding and drag to make it longer. While the pointer rests on an empty spot, a dashed outline shows where a double-click would put the note. Double-click a note to cut it in two where you clicked: the second half is another note on the same syllable, so the word keeps its spelling.
- Arrow Up / Down move the selected notes a semitone, or an octave with Shift. Arrow Left / Right move their words one grid space. Alt+Arrow Left / Right select the previous or next note.
- C cuts the selected notes in half. J merges them into one note, if they're neighbouring syllables of one word or notes without words that touch. While Musical Typing is on, J plays its note instead, so merge from the roll's Edit menu. Q puts the selected notes' words on the grid, and Shift+Q puts their ends on it too.
- Delete or Backspace takes the selected notes off their syllables and keeps the words. A note with no word under it goes completely.
Two of these edits have a button of their own on the roll's ruler, beside the Edit menu, so you do not have to remember the key: Q with a magnet, which snaps the selected notes to the grid named two controls to its left, and a sing button with a microphone. Hold the sing button (or hold M) and sing a pitch, and the selection moves to it: the earliest selected note lands on the pitch you sang and the rest keep their intervals, which is the same rule the take bar sings by. The octave setting from the note card applies here too. Both buttons are dimmed rather than hidden when nothing is selected, and the sing button is there only while Sing to Pitch is on in the input settings and the shell can open a microphone.
The Pencil button in the roll's header is for drawing a run of notes. Click it and it stays on: press the grid to add a note there, dragging to draw its length, and click a note to remove it. Click the button again, or press Esc, to finish. Hold the button instead of clicking it and the pencil lasts only as long as you hold.
These keys work on the roll while your last click was in it, and the timeline's floating piano stays out of the way meanwhile. Click the timeline and the keys go back to it. Edit in the roll's header, or a right-click on a note, opens the same actions as a menu, plus moving the section's whole melody up or down an octave and clearing the section's melody (the words stay). A right-click on a selected note (or a Control-click on a Mac) leaves the selection as it was, so the menu acts on every note you selected.
A click also sets where the song will play from. Click a note and the play position moves to the start of that note, or to the start of the first selected note after a Shift-click. Click an empty spot and it moves to the grid line at or before where you clicked. Neither interrupts a song that's already playing. Click the ruler along the top to set the play position there (a playing song jumps to it), double-click the ruler to play from there, or press Space.
To zoom and scroll:
- The minus, Fit and plus buttons in the header zoom out, fit the section to the width, and zoom in.
- Ctrl-scroll or a trackpad pinch zooms in time, Ctrl+Alt-scroll makes the rows taller or shorter, and Alt-scroll moves sideways.
- Drag the ruler up or down to zoom and sideways to scroll. Drag the note names up or down to resize the rows, or click one to hear that pitch.
- Press the scroll wheel and drag to pan.
- + and - zoom, Cmd/Ctrl+0 fits, and Z fits the selected notes (or the whole section when nothing is selected). While Musical Typing is on, Z stays its octave key.
- Cmd-scroll over the roll (Ctrl+Shift-scroll on Windows) changes the grid size, as , and . do.
10.7 Recording and pitch detection
When you have a melody in your head but not on a keyboard, sing it.
Choosing what to record
Beside the record button in the toolbar sits a small picker naming what the next take captures. It has three settings:
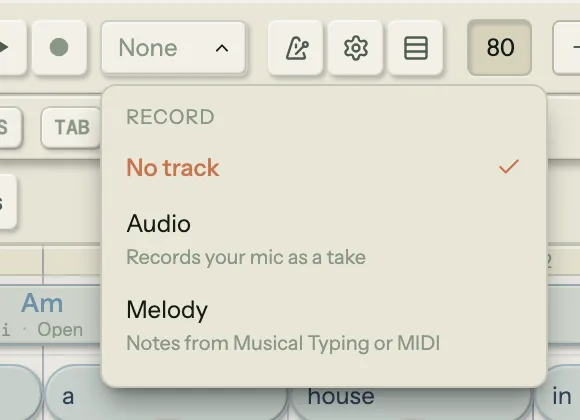
- No track. Record captures nothing. This is where a new song starts.
- Melody. Notes you play, from Musical Typing or a MIDI keyboard, land straight on the timeline.
- Audio. Your microphone is recorded as a take on the Audio track, which is what you sing or hum into and then detect a melody from.
Pick one, then press the global R key or click record. The playhead advances and capture begins. If nothing is chosen yet, pressing record opens the picker instead of starting a take.
The take lands where the playhead is. Click the grid where you want to start before you record, and the picker names the section it is going into. Recording while the song is already playing punches in at the playhead instead.
Choosing Audio opens your microphone and holds it open until you switch to something else, so the first take is already at full level rather than fading up over its opening seconds. On macOS that means the system recording indicator stays lit for as long as Audio is the picked track. If the microphone can't be opened, the take doesn't start and a short message says why: access was denied, no microphone was found, another app is using it, or (in the plugin) your DAW isn't letting plug-ins use the microphone.
With Audio picked, a small piano button sits beside the record picker. It's a tuning keyboard: press a key to hear that pitch, so you have a note to start your take on. The key you pressed also sounds again under the count-in of your next take and stops a beat before recording starts, then it's used up. Press the same key again to cancel it, and use the octave arrows under the keys to reach higher or lower notes.
Notes played via Musical Typing during recording land on the timeline in real time, quantized to the current snap division. When you stop, the recorded notes are committed as lyric blocks (melody-only if no text exists at that beat, or added to existing blocks if they overlap).
Detecting melody from a take
If you sang or hummed into the mic, Song Cage can pull the pitches out of the take and turn them into notes you can place on the grid.
Expand the take and a bar appears under its waveform, holding everything you do to that take. Before detection it holds two things: a play button, and Detect melody beside it. Click Detect. A status line beside it reports what is happening, and when the run finishes the notes open in a piano roll between the waveform and the bar. The bar moves down under the roll, right above the lyric lines the notes will go onto.
The take's piano roll is drawn like the section piano roll (§10.6): note names that follow the key, rows shaded like piano keys, the section's chords in a row above the notes, bar lines, and the timeline's line breaks marked with a double line. It shows the whole take as one picture instead of wrapping like the timeline, fitted to the width, and scrolls sideways only when the notes would get too narrow to grab. A thin line runs through each note, tracing the pitch you actually sang, which is the evidence for any correction you make. Hover a note to see its pitch, the bar and beat it starts on, and how sure the detector is of it.
The roll has a fixed height and scrolls up and down inside it. Until you click in it, the mouse wheel scrolls the page past it; after a click, the wheel scrolls the roll until the pointer leaves it. Drag its bottom edge to change the height, which every take shares. It zooms and scrolls the same ways as the section piano roll, with its zoom buttons on the take bar, and its zoom keys work once you've clicked inside the take.
Detection reads the trimmed part of the take, not the whole recording. If you have moved the trim handles, the bar names how many seconds it is about to analyze, so a take cropped down to a second doesn't look like a broken detector when it comes back with one note.
In the web app, the first detection on a device downloads the pitch model, around 51 MB, and the bar warns you before you spend it. It is stored in your browser, so it happens once: every detection after that runs offline, and your voice never leaves the device. If the model can't be reached, detection still runs on a simpler built-in one and the bar marks the result Basic detection, so a thinner set of notes is never a mystery. Detect again once you're back online. The desktop app and the plugin have the model built in, so there's nothing to download and detection works offline from the first take.
If a run finds nothing, the bar says so and offers a hint rather than sitting silent. A hum that is quiet, breathy, or very short is the usual cause.
The take bar
Once notes exist, the bar sits under the piano roll and carries these controls, left to right in the order you use them.
- Play, with a Hum / Melody switch attached to it. The switch says what the button plays: the recording as you sang it, or the notes the detector read out of it. Flipping it while something is playing switches straight over, which is how you compare the two. Clicking the take flips it too: a click on the waveform picks Hum, and a click anywhere in the piano roll picks Melody. A click also moves the take's start point, so the next play starts there whichever one plays: on the waveform, to where you clicked; on a note, to the start of that note (after a Shift-click, of the first selected note); on an empty spot, to the grid line at or before it. A click on a note or an empty spot doesn't interrupt a melody that's already playing. A click on the roll's ruler moves the start point there and a playing preview jumps to it; double-click the ruler to play from there. While Hum plays the waveform above fills; while Melody plays a line sweeps the piano roll, so you can see exactly which note is sounding. Space plays it too once you have clicked inside the take, waveform included, and a click anywhere else gives Space back to the song.
- A key picker for snapping the notes to a scale: As sung, up to two one-click keys, and a chevron that opens the full grid of all twenty-four. The one-click keys are deliberately not just the ranker's first picks. Snapping moves each note to the nearest pitch in the scale, so two keys that agree on the notes your melody happens to use are the same button wearing two names, and offering both is the menu overstating how many choices it has. What the row offers instead is targets that actually sound different on this take, best first, with your song's own key leading whenever it stays within one note of the best fit. Each one is annotated with what it will do ("3 of 21 notes nudged") rather than with a confidence percentage, because the count is checkable by eye and the right key is usually the one that changes least. Hover a key, in the row or in the grid, and the piano roll shows the notes where that key would put them before you take it: nothing is written until you click, so you can try the whole grid and leave the take exactly as you found it. Picking a key while the melody plays restarts it in that key, so you can compare by ear. Where a key moved a note, a dashed line marks the pitch you actually sang. Select three or more notes and the one-click keys are ranked from those notes alone, which is how you find the key of one phrase. Snapping is not destructive either way, so As sung always returns the raw detection.
- A grid button, showing the timeline's current grid size. With notes selected, it snaps their starts to that grid and leaves their lengths alone (Q does the same, and Shift+Q snaps their ends too). It only ever acts on the notes you selected, and stays dim until you select some.
- A sing button. Hold it, or hold M, and sing: the first selected note takes the pitch you sang, and the rest of the selection moves with it by the same interval. The oct setting from the inline piano applies here too. It sits next to the grid button, both of them shaping the take before anything is kept, and is dimmed, not hidden, until notes are selected, so the M on its face is there to be learned before you need it.
- Place on lyric line, the commit, covered below.
- Edit, holding the things you reach for less often: split or merge notes, snap the selected notes to the grid, shift the whole melody an octave up or down, detect again under the selected notes only (the rest of the take stays as you edited it), detect the whole take again, or clear the melody and start over. Right-clicking a note opens the same menu there.
- Zoom buttons (minus, Fit, plus) for the piano roll.
Collapsing the take hides the waveform, the piano roll and the bar together, and the take's header keeps showing the note count, so a detected melody is never off screen without a trace.
Editing detected notes
Detected notes are not yet on the timeline; they're in the take's piano roll, where they're cheap to move and reshape before you commit. The gestures are the section piano roll's (§10.6), except that a note here moves on its own rather than with a word.
- Click a note to select it and hear it. Shift-click extends a range, Cmd/Ctrl-click adds or removes one note, and dragging across empty space selects every note the box touches. A right-click on a selected note (or a Control-click on a Mac) keeps the whole selection for the menu.
- Drag a note up or down to change its pitch, or sideways to retime it (hold Shift to keep the pitch). With several notes selected, they all move together. Sideways moves are magnetic to the timeline's grid, as in the section piano roll, and Alt (Option on a Mac) lets a note sit between the lines. Change the grid with , and . while you work.
- Drag either end of a note to shorten or lengthen it from that side, magnetic in the same way, so you can tidy a tail onto a line without moving the attack.
- Double-click a note to cut it in two where you clicked. Double-click an empty spot to add a note one grid space long, already selected; keep holding and drag to make it longer. A note you add is drawn as an outline, since nobody sang it. Double-click inside the time of a note that's already there and that note moves to the row you clicked, because a take is one voice.
- Arrow Up / Down move the selected notes by one semitone; hold Shift to move them a whole octave, which is the Edit menu's octave shift scoped to the notes you picked rather than the whole take. If any of them would run off the end of the piano, none of them move.
- Arrow Left / Right move the selected notes one grid space earlier or later. If the first selected note sits between two grid lines, it goes to the next line in that direction first and the others keep their spacing, so the arrows tidy as they go. Alt+Arrow Left / Right move the selection to the previous or next note instead, sounding each one, so you can walk through the take note by note without touching the mouse.
- C splits the selected notes in two and J merges a run of neighbouring notes into one (while Musical Typing is on, J plays its note, so merge from the take's Edit menu). A wordless hum has genuinely ambiguous note boundaries, since two syllables on one pitch look the same as one held note, and each note becomes one lyric block: getting the count right here is what gives you the right number of syllable slots to write into.
- Q snaps the selected notes to the grid, and Hold M sings a new pitch onto them, as the take bar's buttons do.
- Drag the brackets at the start and end of the take to leave notes out. Notes outside them are drawn faded with a dashed outline, and they aren't played, placed or used to rank keys. Nothing is deleted: drag a bracket back over them to bring them back. Dragging the start bracket left adds room in front of the first note.
- Delete or Backspace removes the selected notes. Escape clears the selection. Cmd/Ctrl+Z undoes edits to the notes, in step with your other edits to the song.
Committing to the timeline
Place on lyric line works two ways. Click it and the melody lands in this section, starting from the top. Drag it onto any lyric lane instead, in this section or another one, and the first note lands on the beat you drop it at, which is what you want when the phrase belongs partway through a line or in a different section entirely. Rest the pointer on the button and every lyric line it can land on is outlined, with a hint to drag the melody onto a line; while you drag, the line under the pointer gets a heavier outline and dashed outlines show where the notes will land. Notes left outside the take's brackets stay behind.
Either way the rest of the notes keep their relative timing at the take's tempo, and durations come straight from the detection (a 1/16 sung note lands as a 1/16 lyric block, not stretched up to the active snap grid), so back-to-back short notes don't overlap. If the melody runs longer than the section it's going into, the section grows to fit in the same step, so no note ends up past the end where no line would draw it.
The notes become real lyric blocks (melody-only, no text) in the target section, and the take you sang collapses behind them. You can type the lyric in afterward, drag the blocks around the grid, or open the inline piano on any of them to nudge a pitch.
A voice memo captured on your phone works the same way, with one step in front of it. Expand the idea in the Ideas Inbox and drag its audio piece onto a section: that copies the take onto the section's Audio track and opens its waveform. Hit Detect melody there and everything above applies unchanged.
What happens to the audio take itself
The mic recording is also saved as an audio take on the Audio track, not just consumed by pitch detection. A few details that matter when recording against a looped section:
- The clip keeps the full length you recorded. If you let the loop cycle twice and recorded a two-bar idea over a one-bar section, the saved take is two bars long, not one. Nothing gets truncated on save.
- During loop playback, the take plays once from its anchor while the chords and metronome keep looping underneath. The take doesn't retrigger on every wrap.
- During linear (full-song) playback, the take is clamped at its section's end so it can't bleed into the next section.
- Trim handles appear at the edges of the take's waveform when expanded. Drag them to pick the portion you want to keep. Trimming doesn't rewrite the audio, just sets in/out points that can be moved back any time.
- Too long for the section? If the trimmed take runs at least half a section past the end, a Double section to fit button appears in the take bar. It extends the section and duplicates its existing content in one click.
10.8 Melody voices
The default voice, Singer, sings your melody on the words: each note gets its own syllable of the lyric, and a note with no lyric sings "ooh". The others are sampled instruments: four Mellotron tape voices and two guitars. Choose one from the Melody Voice list in Settings (in the menu bar, or right-click the lyric lane and choose Melody Settings...):
- Singer (sings lyrics): a synthesized voice that sings the lyric (the default)
- Female: chamber vocal sample
- Male: chamber vocal sample
- Flute: the tape-based flute sound from classic recordings
- Violins: string ensemble sample
- Acoustic Guitar: sampled steel-string acoustic
- Electric Guitar: sampled clean electric
- Off: disables melody playback entirely (notes are still stored, just silent)
The voice applies to the whole song, not per block, and it is saved with the song (Chapter 13). Switching voices takes effect on the next note played or on the next playback start. To make the melody louder or quieter against the chords, turn the knob beside Melody in the track bar (Chapter 5).
10.9 Melody and chord suggestions
Chapter 9 described the Fits Melody section in the chord palette. Here's the other direction: the melody you write shapes the chords the palette suggests.
Every time you place, nudge, or delete a melody note, the chord palette recalculates its Fits Melody rankings for any beat range that overlaps the change. Add an A4 to a beat and the palette boosts chords that contain A as a chord tone (Am, F, Dm, A). Remove it and the rankings shift back.
Rhythm counts as well as pitch. A long note on a downbeat carries more weight than a short one between beats, and a note that is approached and left by step on a weak beat is read as a passing tone the harmony is not expected to contain. Move the same note from an offbeat onto the downbeat and the rankings shift even though the pitch never changed.
This feedback loop means melody and harmony develop together. You don't need to finish one before starting the other. Place a few chords, sing a phrase over them, check whether the palette's suggestions still make sense, adjust a note, watch the rankings respond. The two layers are always in conversation.
10.10 Melody Ideas
Once a section has at least two melody notes, a Melody Ideas button appears in its header beside Auto Chords. It opens a strip under the header that makes new lines out of the melody you already have. Nothing it makes is written over your line: every idea lands as an alt of the section (§5.10), a version with its own tab that you can play, edit, keep, or delete like any other.
Melody Ideas comes with the Song Cage licence and with the 14-day trial (Chapter 17). Without either, the button opens the licence offer. It's in the web app, the desktop app and the plugin; the iPad app gets it with its next update.
The four moves
Pick a move from the four on the strip. The first pick copies the version on screen into a new alt, named after the move, and shows it with the new line as its melody. The chords stay as they are, and your words go back on the new notes in order: notes left over after the words run out are bare melody notes, and syllables left over are dropped (from the new alt only).
- Bones keeps the notes that carry your tune and grows a new line on them from your own hook.
- Reply answers your phrase with a new one after it, made out of yours.
- Motif develops your phrase: moved up or down, answered from the fifth, fragmented, upside down, backwards. Tick Add after to keep your phrase as it is and play the new one after it.
- Morph walks your melody towards another version of the section, picked under towards. It needs the section to have another alt to walk to; until then it's greyed out.
One knob per move
Each move has one knob, with a word beside it saying where it's set:
- Rewrite (Bones) goes from as sung to new tune: fewer of your notes kept, more room filled, wider leaps, more offbeats and fewer repeats as it turns.
- Dare (Reply) goes from an echo of your phrase to an open-ended answer that strays from it.
- Develop (Motif) walks through the ways a tune grows: step up, steps down, answer, fragment, pushed off the beat, upside down, backwards. It starts at answer.
- Blend (Morph) goes from this version through halfway to the other version.
Drag the knob up or down (hold Shift for fine steps), scroll on it, or use the arrow keys once it has focus. Double-click it to go back to where the move starts. However far you turn it, a drag or a scroll is one undo step.
Rolling, keeping, and closing
Every change rewrites the same idea from the same source, so turning the knob or trying another move never stacks up tabs. The strip says which version it is working from (from A). Bones and Reply have a ↻ button for another roll at the same setting. When you like an idea, press +: it keeps that one and writes the next idea into a new alt, made from the same source.
Switch to another tab and the next change makes a version of that tab instead. Edit an idea's melody by hand and it becomes yours: the next move makes a new version of it rather than writing over your edit.
Close the strip with ×, or click Melody Ideas again. Every version it made stays as a tab.
10.11 Melody shortcuts reference
| Action | Shortcut |
|---|---|
| Note of the key (piano open, song has a key) | 1-7, 8 for the root an octave up |
| Borrowed note from the parallel key | Shift+1-7 |
| Turn on Musical Typing | K |
| Play note (Musical Typing) | A-L (naturals), W/E/T/Y/U (sharps) |
| Octave down | Z |
| Octave up | X |
| Sing the note in (hold, sing, release) | M |
| Add another note to this syllable | N |
| Clear the note on this syllable | 0 |
| Nudge pitch up (scale degree) | Arrow Up |
| Nudge pitch down (scale degree) | Arrow Down |
| Move the note an octave | Shift+Arrow Up / Down |
| Move to next syllable/block | Arrow Right |
| Move to previous syllable/block | Arrow Left |
| Move the selected blocks one grid space | Alt+Arrow Left / Right |
| Delete note | Delete / Backspace |
| Type the selected block's lyric | Enter |
| Deselect and close the piano | Escape |
| Record your microphone | Shift+R |
| Record the picked track | R |
In either piano roll, once you've clicked in it, these keys act on the notes you selected there:
| Action | Shortcut |
|---|---|
| Move the selected notes a semitone | Arrow Up / Down |
| Move the selected notes an octave | Shift+Arrow Up / Down |
| Move the selected notes one grid space | Arrow Left / Right |
| Select the previous or next note | Alt+Arrow Left / Right |
| Split the selected notes | C |
| Merge the selected notes | J |
| Snap the selected notes to the grid (ends too) | Q (Shift+Q) |
| Remove the selected notes | Delete / Backspace |
| Sing a pitch onto the selected notes (a take, or the section piano roll) | M (hold) |
| Zoom in / out | + / - |
| Fit the roll to the width | Cmd/Ctrl+0 |
| Fit the selected notes | Z |
| Make the grid finer / coarser | , / . |
That covers melody input, from a single click on the piano to a full sung phrase run through pitch detection. The next chapter covers what happens when you want the key itself to change mid-song: modulation routes and key shifts.