Press play and the timeline comes alive. Chords strum or sustain in the instrument you've chosen, the melody sings its lyrics back to you, and a metronome keeps time underneath. Loop a section, switch the rhythm pattern, and adjust the tempo without stopping.
What you'll learn
- How the transport controls start, pause, stop, and reset playback
- How to set and adjust the tempo
- How the metronome and count-in work
- How to loop one section or a range of adjacent sections
- How rhythm patterns shape the way chords sound during playback
- How the melody voices turn your pitch data into sound, and how to set the melody's volume
- Where all the playback settings live and what each one does

The previous chapters built a song: sections, lyrics, chords, melody, voicings, and keys. This chapter is about hearing it. The transport controls in the toolbar are the entry point. Everything else connects through them: the metronome, the count-in, the looping, the rhythm patterns, and the melody voices.
13.1 The transport
Five buttons in the toolbar control playback:
- Return to start. Stops playback and moves the insert marker to beat 1 of the first section. To jump back to the top without stopping, press Enter with nothing selected: a song that's playing carries on from the beginning.
- Stop. Halts playback, cancels any count-in or recording in progress, and resets the playhead to where it was before you pressed play.
- Play / Pause. Starts playback from the insert marker. Press again to pause: the playhead freezes where it is, and the marker stays where you put it. Press again and playback returns to the marker rather than picking up from the pause. To carry on from the stop point instead, press Shift+Space.
- Record. Starts a take on the track named by the picker beside it. From a stop, pressing record plays a lead-in first (one bar unless you change Pre-roll, see 13.3), then capture begins. While the song is already playing, it starts capturing straight away. Press record again while recording to stop. With no track picked, record opens the picker instead. Chapter 10 covers the recording workflow in detail.
- Metronome. Toggles the click track on or off. When on, you hear an accent click on beat 1 and lighter clicks on the remaining beats in each measure. The lead-in before a take always clicks, and so does the take itself while Click While Recording is on (13.3); otherwise the metronome follows this toggle.
The insert marker
The pulsing triangle with a line dropping through the lanes is the insert marker. It's the position Space starts from, and it stays put while the playhead moves, so the two are separate things on screen.
You set it by clicking: the beat ruler, an empty cell in a lane, or any chord block, lyric block, or syllable. Clicking a block parks the marker at the front of what you clicked, so pressing Space plays from that word or that chord. Hovering a line previews where a click would land before you commit to it.
The piano roll that opens under the timeline for a section's melody aims the marker the same way: click a note to park it on that note, or an empty spot to park it on that grid cell. Neither click interrupts a song that's already playing.
When playback has run somewhere you'd rather keep working from, press Cmd/Ctrl+Shift+Space to pick the marker up and drop it on the playhead, snapped to the grid.
This is what makes Space a rehearsal key. Play a phrase, pause, press Space, and you hear the same phrase again from the same place, as many times as it takes.
13.2 Tempo
The tempo display sits in the toolbar, showing the current BPM. Two ways to change it:
Drag vertically. Click the BPM number and drag up to increase or down to decrease. The sensitivity is about 2 pixels per BPM, so small movements make fine adjustments.
Double-click to type. Double-click the BPM number to enter a precise value. Type the tempo and press Enter. The valid range is 20 to 300 BPM.
Tempo changes take effect immediately, even during playback. The engine reschedules all upcoming events at the new speed without interrupting the current beat. If you're not sure what tempo to use, start at 120 and adjust while listening.
13.3 The metronome and count-in
The metronome
The metronome plays two tones: a higher-pitched accent on beat 1 of each measure and a softer click on the remaining beats. Both are simple sine waves (G5 for the accent, C5 for the normal click), so they cut through without masking your chords or melody.
The metronome respects the time signature of each section. In 6/8 time, you hear six clicks per measure. In 4/4, four. If your song switches time signatures between sections, the metronome adjusts automatically at each section boundary.
Click While Recording
A take clicks whatever the toolbar's metronome toggle says, so you always have the beat to sing or play against, while plain playback keeps its own choice. The switch is Settings > Metronome > Click While Recording: on by default and saved on your device. A punch-in (recording while the song is already playing) clicks too. Turn it off and a take clicks only when the toolbar metronome is on.
Count-in
When you press record from a stop, Song Cage plays a lead-in before capture begins: one bar by default, or however many bars Pre-roll is set to in Settings (0, 1, 2, or 4). Where the song has bars before the insert marker, the lead-in plays them with the metronome clicking over them; where it doesn't, you hear bars of clicks on their own. This gives you a chance to feel the tempo and prepare. The clicks follow the time signature of the section at the marker: in 4/4, you hear four per bar; in 3/4, three.
During the lead-in, a large number pulses in the center of the screen, counting down the beats left before the take, so you can see where you are even without headphones. When it runs out, recording begins. If you're recording your voice and the microphone has only just been opened, a Mic warming up note with a microphone icon shows in the same place for a moment first.
With Audio picked to record, a small piano button (Tuning note) sits beside the record picker. Open it and press a key to hear that pitch (press the same key again to clear it). As long as Pre-roll isn't 0, the note sounds again under the next take's lead-in and stops a beat before recording starts, so you know the note to come in on.
13.4 Looping
Looping lets you repeat a section (or a range of sections) indefinitely during playback. This is useful for practicing a tricky passage, auditioning chord changes, or recording multiple takes over the same section.
Looping a single section
Each section header has a loop button (a circular arrow icon). Click it to loop that section. During playback, when the playhead reaches the end of the looped section, it jumps back to the beginning and keeps going.
Looping a range
Shift+click the loop button on a different section to extend the loop. The loop range expands to cover every section between the first looped section and the one you shift-clicked. This is how you loop a verse and chorus together, for example.
Clearing a loop
Click the loop button on any looped section to clear the loop. Playback continues linearly from wherever the playhead is.
Looping and the cursor
When a loop is active, playback still starts from the cursor position. If the cursor is inside the loop range, playback begins there and loops at the boundary. If the cursor is outside the loop range, playback begins at the cursor and enters the loop when it reaches the loop start.
13.5 Rhythm patterns
When you press play, chords don't just sustain as a single block of sound. The accompaniment engine applies a rhythm pattern that controls how the notes are triggered: the timing, the direction (downstroke vs. upstroke), the velocity, and which strings or notes sound on each hit.
Choosing a pattern
Open Settings in the menu bar and find the Rhythm Pattern dropdown under Rhythm (in the desktop app, Settings > Rhythm). The available patterns depend on the current instrument and the song's time signature:
Guitar patterns (4/4):
- Single Strum: one downstroke per chord, no repeat. The simplest option, and it fits every time signature.
- Folk Strum: a two-bar down-down-up-up-down-up pattern. This is the classic campfire strum.
- Travis Pick: alternating thumb bass notes with finger-picked upper strings. Think Bob Dylan or Paul Simon.
Piano patterns (4/4):
- Single Hit: the piano's Single Strum, one chord per block with no repeat.
- Rhythmic: block chord hits with accented downbeats.
- Coconut: block chords with dotted bass fills between them. Named after Harry Nilsson's "Coconut."
Waltz patterns (3/4):
- Waltz Strum (guitar): three downstrokes per measure.
- Waltz (piano): oom-pa-pa, root note followed by upper voices on beats 2 and 3.
- Waltz Arpeggio (piano): root note, then cycling through the upper chord tones one at a time.
6/8, 9/8 and 12/8 patterns:
- 6/8 Strum (guitar): down-down-up, down-down-up, accented on beats 1 and 4.
- 6/8 Pulse (piano): a bass note on each dotted-quarter beat, with the upper voices on the two eighths after it.
- 6/8 Arpeggio (guitar and piano): one note per eighth, up through the chord and back down.
Each of these is one bar of 6/8 long, so in 9/8 and 12/8 it repeats on the same dotted-quarter pulse.
Custom sits at the bottom of the dropdown in every time signature: your own picking pattern, drawn for this song (below).
Custom picking patterns
Pick Custom in the Rhythm Pattern dropdown and the Picking pattern editor opens. With Custom chosen, an Edit pattern button under the dropdown opens it again. The editor is a bar of guitar tab you draw on: six string rows, high e on top the way tab reads, and a Slap row underneath.
- Click a step on a string row to pick that string there, and click it again to take it out. Drag along a row to paint a run. Several strings on one step are picked together, and an empty step is a rest.
- Slap hits the strings dead against the fretboard on that step: a short percussive knock, like a drum on the guitar. It also stops every string that was ringing.
- 1/8, 1/16 and 1/8T at the top set the grid: eighths, sixteenths or eighth-note triplets. Hits keep their place when you switch. A song counted in eighths (6/8, 9/8, 12/8) has no triplet grid.
- 1 bar or 2 bars. A second bar starts as a copy of the first, and a two-bar pattern alternates its bars through the song.
- Play (or Space) runs the pattern once through each of your song's chords in turn, so you can hear the same rhythm land on every one. Click a chord in the row beside Play to see the frets it puts under the pattern.
The pattern plays under every chord of the song and stays on the bar through chord changes, so a chord that starts mid-bar picks up the pattern where the bar is. It follows each chord's shape: when a chord doesn't use a string your pattern picks, the pick moves to the nearest string it does use, the way a thumb moves from the sixth string on G to the fifth on C. The editor marks a moved pick with a ring and an arrow pointing at the string it moves to, and a pick with nowhere to go with a dashed ring (it rests). Clear empties the pattern and Done or Escape closes the editor.
Your pattern is saved for the song on this computer, along with whether the song plays through it: open the song again and it plays its pattern, while a song without one opens on the ordinary patterns. Arpeggio replaces the custom pattern the same way it replaces the others.
Single notes
A chord block that sounds just one note, such as one string typed on the guitar tab's chord staff (Chapter 9), plays that note once and holds it for the length of the block, whatever the rhythm pattern or arpeggio setting. A pattern would only hammer the same note over and over.
The pattern selector automatically filters to show only patterns compatible with the current instrument and the song's time signature. Playback also checks each section: when a section has its own time signature and the chosen pattern was written for a different one, a pattern written for that section plays instead where one exists. In a 6/8, 9/8, or 12/8 section, the patterns written in straight eighths and quarters (Folk Strum, Travis Pick, Rhythmic, Coconut, and the waltzes) switch to a compound one, so the section keeps its dotted-quarter pulse instead of sounding like 3/4. On guitar, Travis Pick becomes 6/8 Arpeggio and the strummed patterns become 6/8 Strum; on piano, they all become 6/8 Pulse. Single Strum (Single Hit on piano) never switches.
How patterns work
Each pattern defines a sequence of strokes, each with a beat offset, a direction, and a velocity. The engine tiles the pattern across the duration of each chord block. For a chord that lasts four beats with a two-beat pattern, the pattern plays twice.
Guitar strokes have physical character: downstrokes sweep all six strings low-to-high with a slight stagger (about 30 milliseconds per string), while upstrokes brush only the top three or four strings high-to-low. The stagger gives strums their natural feel.
Piano strokes attack all notes nearly simultaneously (12 milliseconds of spread), since a pianist's hand hits all keys at once.
Humanize
A Humanize toggle in Settings adds slight random variations to the timing and velocity of each stroke. The result is a looser, more natural feel. Without it, every strum lands exactly on the grid. With it, notes drift by a few milliseconds and velocities vary slightly, the way a real player's hand does.
Arpeggio
Turn on Arpeggio in Settings to play each chord as a sequence of single notes instead of strums. Two controls appear when it's enabled:
- Direction: up (low to high), down (high to low), or up-and-down (bounce).
- Rate: how many notes per beat (1/4, 1/8, 1/8T for triplets, or 1/16).
Arpeggio replaces the rhythm pattern while it's on, so the Rhythm Pattern dropdown greys out. Turn arpeggio off and your previous rhythm pattern returns. The rate is anchored to the quarter-note beat, so it sounds right in any time signature: including section-level overrides.
A separate Preview notes individually toggle lives in the chord-palette header (the waveform icon next to the speaker). It's independent of playback arpeggio: when on, clicking a chord in the palette or a chord block in the timeline plays its notes one at a time so you can hear each voice while working.
13.6 Melody voices
Song Cage includes seven melody voices. The default, Singer, sings your lyrics. The rest are sampled instruments: four Mellotron voices (the Mellotron is a tape-based keyboard from the 1960s, famous for its warm, slightly wobbly character) and two guitars, for melody lines that want plucked attack instead of sustained vocal or string colour.
- Singer (sings lyrics): sings each note on its own syllable of the lyric, so you hear the words on the tune instead of a wordless line. A word held across several notes stays on its vowel until the last one. A note with no lyric under it sings "ooh". It's a synthesized voice, not a recording of a singer and not AI, with a touch of cassette warmth so it sits with the tape voices. This is the default.
- Female: chamber female vocals.
- Male: chamber male vocals.
- Flute: the Mk II Flute tape set.
- Violins: the Mk II three-violins tape set.
- Acoustic Guitar: a sampled steel-string acoustic, the same tone the guitar accompaniment uses.
- Electric Guitar: a sampled clean electric, brighter and more sustained than the acoustic.
You can also choose Off, which disables melody playback entirely (the notes are still stored, just silent).
To change the voice, open Settings and pick one from the Melody Voice dropdown, where the voices are grouped under Voices, Winds, Strings, and Guitars. The voice applies to every melody note in the song.
The voice is saved with the song, as the Guitar/Piano choice is (Chapter 12). Open a song and it plays in the voice you last gave it, on any device. A new song starts with the voice you picked most recently. If you only have view access to a shared song, changing its voice changes it for you and doesn't touch the owner's song.
How melody sounds during playback
Each melody note is triggered at the beat position defined by its syllable split. The duration matches the length of the syllable segment, so a long held syllable rings longer than a quick one. A short fade-in (30 milliseconds) smooths the attack of each sample to avoid clicks.
The melody synth is monophonic: one note plays at a time, matching the single-voice nature of lyrics. When a new note starts, the previous one releases.
13.7 Mute and solo
Chapter 5 introduced the M (mute) and S (solo) buttons in the track bar at the top of the timeline. During playback, these control which tracks you hear:
- Mute a track to silence it. Mute the chord track to hear only melody and audio. Mute everything except the melody to focus on pitch.
- Solo a track to hear only that track (and any other soloed tracks). When any track is soloed, every non-soloed track goes silent. Click solo again to clear it.
Mute wins over solo, as in Logic or Pro Tools: a track you have explicitly muted stays silent even while it is soloed.
Melody volume
The Melody track has a small knob between its name and its M button that sets how loud the melody plays against the chords. Drag it up or down to turn it (hold Shift for finer steps), scroll over it, or click it and use the arrow keys. Hover over it to see the level in decibels. Double-click it to go back to the default, −7 dB. It changes the level while the song plays, and Song Cage remembers it on this device.
Both apply to the whole song: one Chords track, one Melody track, one Audio track. To isolate a part of the arrangement instead of a part of the mix, loop the section.
Live changes
You can toggle mute and solo, or turn the melody knob, while playback is running. The engine reschedules within a fraction of a second, so the change takes effect almost immediately. The same applies to editing chords, lyrics, or melody during playback: the engine picks up the change and adjusts without stopping.
13.8 The Settings menu
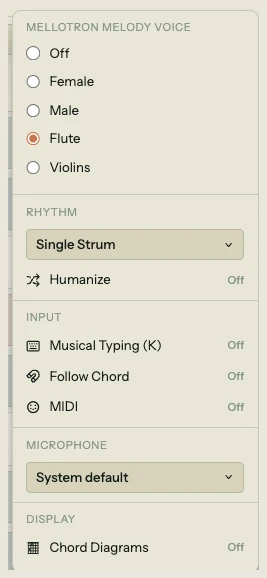
Settings in the menu bar at the top of the editor gathers the instrument and all the playback and input options in one place. In the desktop app it is a Settings menu in the app's menu bar, holding the same things as menus and ticked items. It holds:
- Instrument: Guitar or Piano, with Capo and Tuning when it's Guitar (see Chapter 12)
- Melody Voice: a dropdown with Off, Singer (sings lyrics), Female, Male, Flute, Violins, Acoustic Guitar, Electric Guitar
- Rhythm Pattern: dropdown filtered by instrument and time signature, plus Custom for your own picking pattern (§13.5)
- Humanize: on/off
- Arpeggio: on/off, with direction and rate controls when enabled
- Sustain: how long chords ring on past their block. Short keeps quick chord changes from bleeding into each other, Natural is the default, and Long lets slow progressions ring
- Metronome > Click: Accented stresses beat 1 of each bar (the default). Steady clicks the same on every beat, a pulse to write a rhythm against without counting bars
- Metronome > Click While Recording: on/off, on by default. On, every take clicks, whatever the toolbar metronome says (13.3)
- Musical Typing: enables the computer keyboard as a piano for melody input (see Chapter 10)
- Follow Chord: constrains typed notes to chord tones (see Chapter 10)
- Borrowed Notes: lets a borrowed chord move one melody note a half step to fit it, off by default (see Chapter 9)
- Sing to Pitch: shows or hides the Hold to sing button (and its M key) for singing a note in (see Chapter 10). The row itself is hidden where the app can't use a microphone.
- Auto-Split Lyrics: splits a multi-syllable word into syllables when you commit it (see Chapter 8)
- MIDI Keyboard (desktop app and plugin only): plays a MIDI keyboard into whatever is selected, so a note fills the selected syllable and a chord fills the marked chord slot (see Chapter 10). The desktop app lets you pick the device; in the plugin, notes come from whatever your DAW sends to Song Cage.
- Recording > Pre-roll: how many bars of lead-in play before recording starts (0, 1, 2, or 4; see 13.3)
- Microphone: select the input device for audio recording (only shown when at least one mic is detected)
- Share usage stats (desktop app and plugin only): your answer about sharing which features you use
The display options are in the View menu: Compact Rows, Nashville Numbers, Chord Diagrams on Hover (mini voicing diagrams when you hover a chord block or a palette chord, see Chapter 12) and Dark Theme.
Most of these settings take effect immediately, even during playback. Switching the rhythm pattern, toggling humanize, or changing the melody voice all update in real time.
That covers the playback engine: transport controls, tempo, metronome, count-in, looping, rhythm patterns, melody voices, mute/solo, melody volume, and the Settings menu. The next chapter covers exporting your song as a PDF chord sheet or MIDI file.