A tour of the main regions of the app: toolbar, sidebars, lanes, and the two ways to view a song.
What you'll learn
- The difference between Timeline view and Sheet view, and when to reach for each
- Where chords, lyrics, and melody actually live on the canvas
- Where the section piano roll opens under the timeline
- What each sidebar does and how to open it
- What's in each menu of the menu bar, and what every control in the toolbar is for
Open Song Cage for the first time and there's a lot on screen: a menu bar and a toolbar across the top, a sidebar on the left, a canvas in the middle, another sidebar on the right. Chapter 1 was philosophy. This chapter is geography. We'll walk through every region so that when a later chapter says "open the chord sidebar" or "hit the view toggle" you already know where to look.
If you want to follow along while reading, replay the guided tour with Help > Feature Tour. It loads "House of the Rising Sun" as a demo song: A minor, 6/8 time, one verse, real chords and lyrics already on the grid. Every screenshot in this chapter uses that song, so if you load it and follow along, your screen will match the examples.
2.1 Timeline View
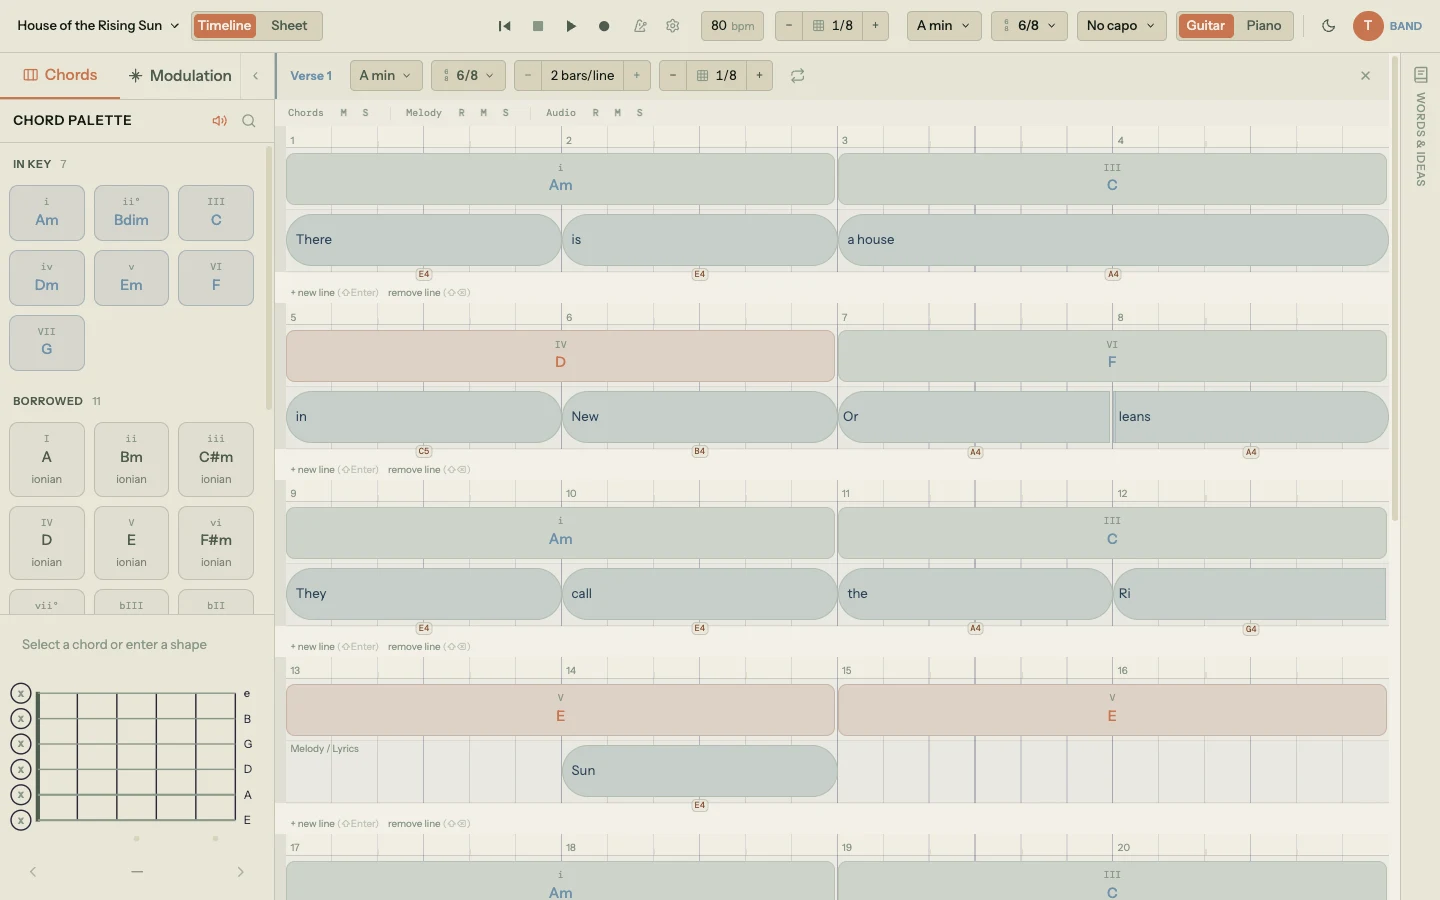
Timeline view is the main canvas. It's where a song grows from a handful of chord blocks into a full arrangement.
At the top of each section there's a beat ruler showing bars and beats. In 4/4 time each bar shows its four beats; in 6/8 it splits into two groups of three eighth notes, and setting the grid to 1/8 shows all six. Below the ruler, each section stacks two horizontal lanes:
- The chord lane on top, where chord blocks sit on the beat grid. In the House of the Rising Sun demo, you'll see Am, C, D, and F spaced across the first line, then Am, C, E, E across the second.
- The lyric lane below, where lyric blocks sit at the beat they're sung on. "There is a house in New Orleans" splits across the first line; "They call the Rising Sun" across the second.
Each section has its own beat count, optional key or mode override, and visual line breaks. The demo song is one "Verse 1" section with eight lines of four bars each, totaling 96 beats.
There's no zoom slider. Each line stretches to fill the width of the timeline area, so how much music a line holds is what sets the scale: fewer bars per line means wider beats. That control is Bars per line in the time signature chip on the toolbar, which any section can override in its own settings, and Chapter 5 covers it. Narrow the line when you're fine-tuning a chord change or a syllable split; widen it when you want to see the shape of a whole verse.
Everything on the timeline snaps to the grid. The snap division (how fine the grid is) is controlled separately, from a whole note (in bars of four beats or more) all the way down to 1/32 notes. Chapter 5 will cover sections, bars per line, and snap in depth.
Timeline view is where you'll spend most of your time if you care about rhythm, beat alignment, or fitting a chord change to a specific melody note.
The section piano roll
The bar along the bottom of the timeline ends in a Piano roll button (P). Click it to open a piano roll of one section's melody, docked under the timeline the way a DAW docks its editor under the arrangement, and click it again to fold it away. It starts closed. With the guitar instrument a Guitar tab button (Shift+P) sits beside it and opens the same dock as guitar tab: the chord shapes and the melody on six-string staves (Chapters 9 and 10). Drag its top edge to make it taller or shorter, and Song Cage remembers both whether you left it open and how tall you made it.
The roll follows the section you're working in: the one you last clicked on the timeline or, while the song plays, the one under the playhead (unless you're working in the roll itself). To pick a different one, click the section name in the roll's header. Beside the name, the header shows that section's key, its time signature and the grid division the notes snap to.
The notes are the section's syllables, so the roll and the timeline are two views of one melody. Select a note in the roll and its syllable is selected on the timeline, and Undo takes back an edit made in either place. Drag a note up or down to change its pitch or sideways to move its word, drag either end to change its length, and double-click an empty spot to add a note one grid space long. Edit at the right of the header splits and merges notes, snaps them to the grid, moves the section's melody up or down an octave, and clears it, and the −, Fit and + buttons beside it zoom the roll. Keyboard Shortcuts & Tips lists the roll's keys and scroll gestures.
The piano roll is part of Timeline view in the web app (on an iPad too), the desktop app and the plugin. It isn't in Sheet view or in the phone layout.
2.2 Sheet View
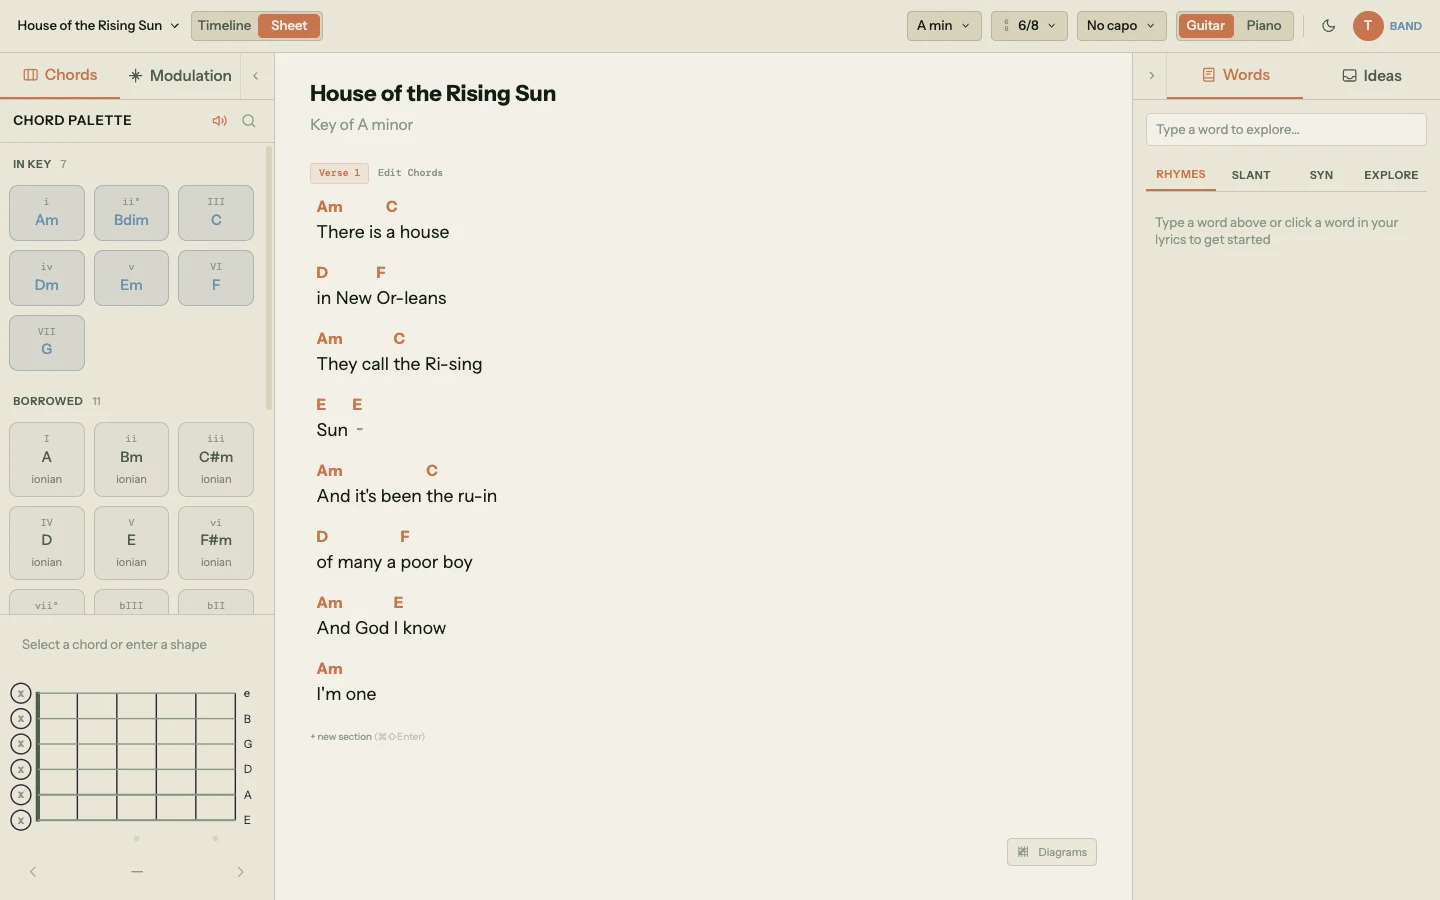
Sheet view shows the same song as a printable chord-lyric layout. No beat grid, no draggable blocks: just chord names floating above the words, grouped by section.
It's the same underlying data as the timeline. Every chord and lyric you see in sheet view is the same chord and lyric you see in timeline view, rendered differently. Edit a lyric here and the timeline updates; edit a chord here and the timeline updates. There's no conversion, no import, no export between the two views. They're two windows on the same thing.
Sheet view is the better place to be when:
- You're writing lyrics first and don't want to worry about beat positions yet. Click into a section and type; it feels like a text editor.
- You're reading back through a song to check if it makes sense as words.
- You want a printable version. Sheet view is what the PDF export is based on (Chapter 14 will cover export).
In the House of the Rising Sun demo, sheet view shows "There is a house in New Or-leans" with Am and C above it, then "They call the Ris-ing Sun" below with Am and C above that. The hyphens are how syllable splits render in text form. Chapter 8 will cover splits in detail.
2.3 Switching Between Views
The view toggle lives in the toolbar. It flips between timeline and sheet with one click. No dialog, no confirmation, no loading.
Your work never moves when you switch. Both views read from the same stored chord and lyric blocks; they just render them differently. If you move a lyric block to beat 12 in timeline view, switch to sheet view, then switch back, the block is still at beat 12. If you type a new word in sheet view, switch to timeline, the word is there, sitting on the beat you implied by its position in the line.
In practice, most writers go back and forth several times per session. Get the words down in sheet view, switch to timeline to nudge the rhythm, switch back to refine a phrase, switch forward to add a chord. Neither view is "primary"; they're tools for different jobs.
2.4 The Toolbar
The toolbar runs across the top of the window, under the menu bar, in three zones: identity on the left, transport in the middle, and song context on the right. Commands and preferences live in the menu bar above it.
The menu bar
A menu bar runs across the very top of the editor, above the toolbar: File, Edit, View, Settings and Help.
- File. New Song, Open… (which opens your song list under the song title), Duplicate, Rename…, Share…, the exports (Song File, PDF, PDF in Nashville numbers, and two kinds of MIDI), and Delete…, or Leave Song… for a song someone shared with you. In the plugin, File also has Open Song File…, the cloud library's save actions, and your account at the bottom, and it has no Duplicate or Delete.
- Edit. Undo, Redo, Cut, Copy and Paste. Cut, Copy and Paste act on the chords and lyrics you've selected on the timeline, the same as the keys.
- View. Timeline or Sheet, Play Live, Ideas (opens or closes the Ideas room, like the Ideas button), Compact Rows, Nashville Numbers, Chord Diagrams on Hover and Dark Theme. A tick shows which view you're in and which options are on.
- Settings. The instrument (Guitar or Piano), with capo and tuning when it's Guitar, then the playback and input settings: melody voice, rhythm, the metronome click and Click While Recording, Musical Typing, Follow Chord, Borrowed Notes, Sing to Pitch, Auto-Split Lyrics, the MIDI keyboard (desktop app and plugin), pre-roll and microphone. Chapter 13 covers each one.
- Help. Quick Start, Feature Tour, Keyboard Shortcuts (the ? key opens it too), Help & Docs in a browser, and Report a Bug when you're signed in.
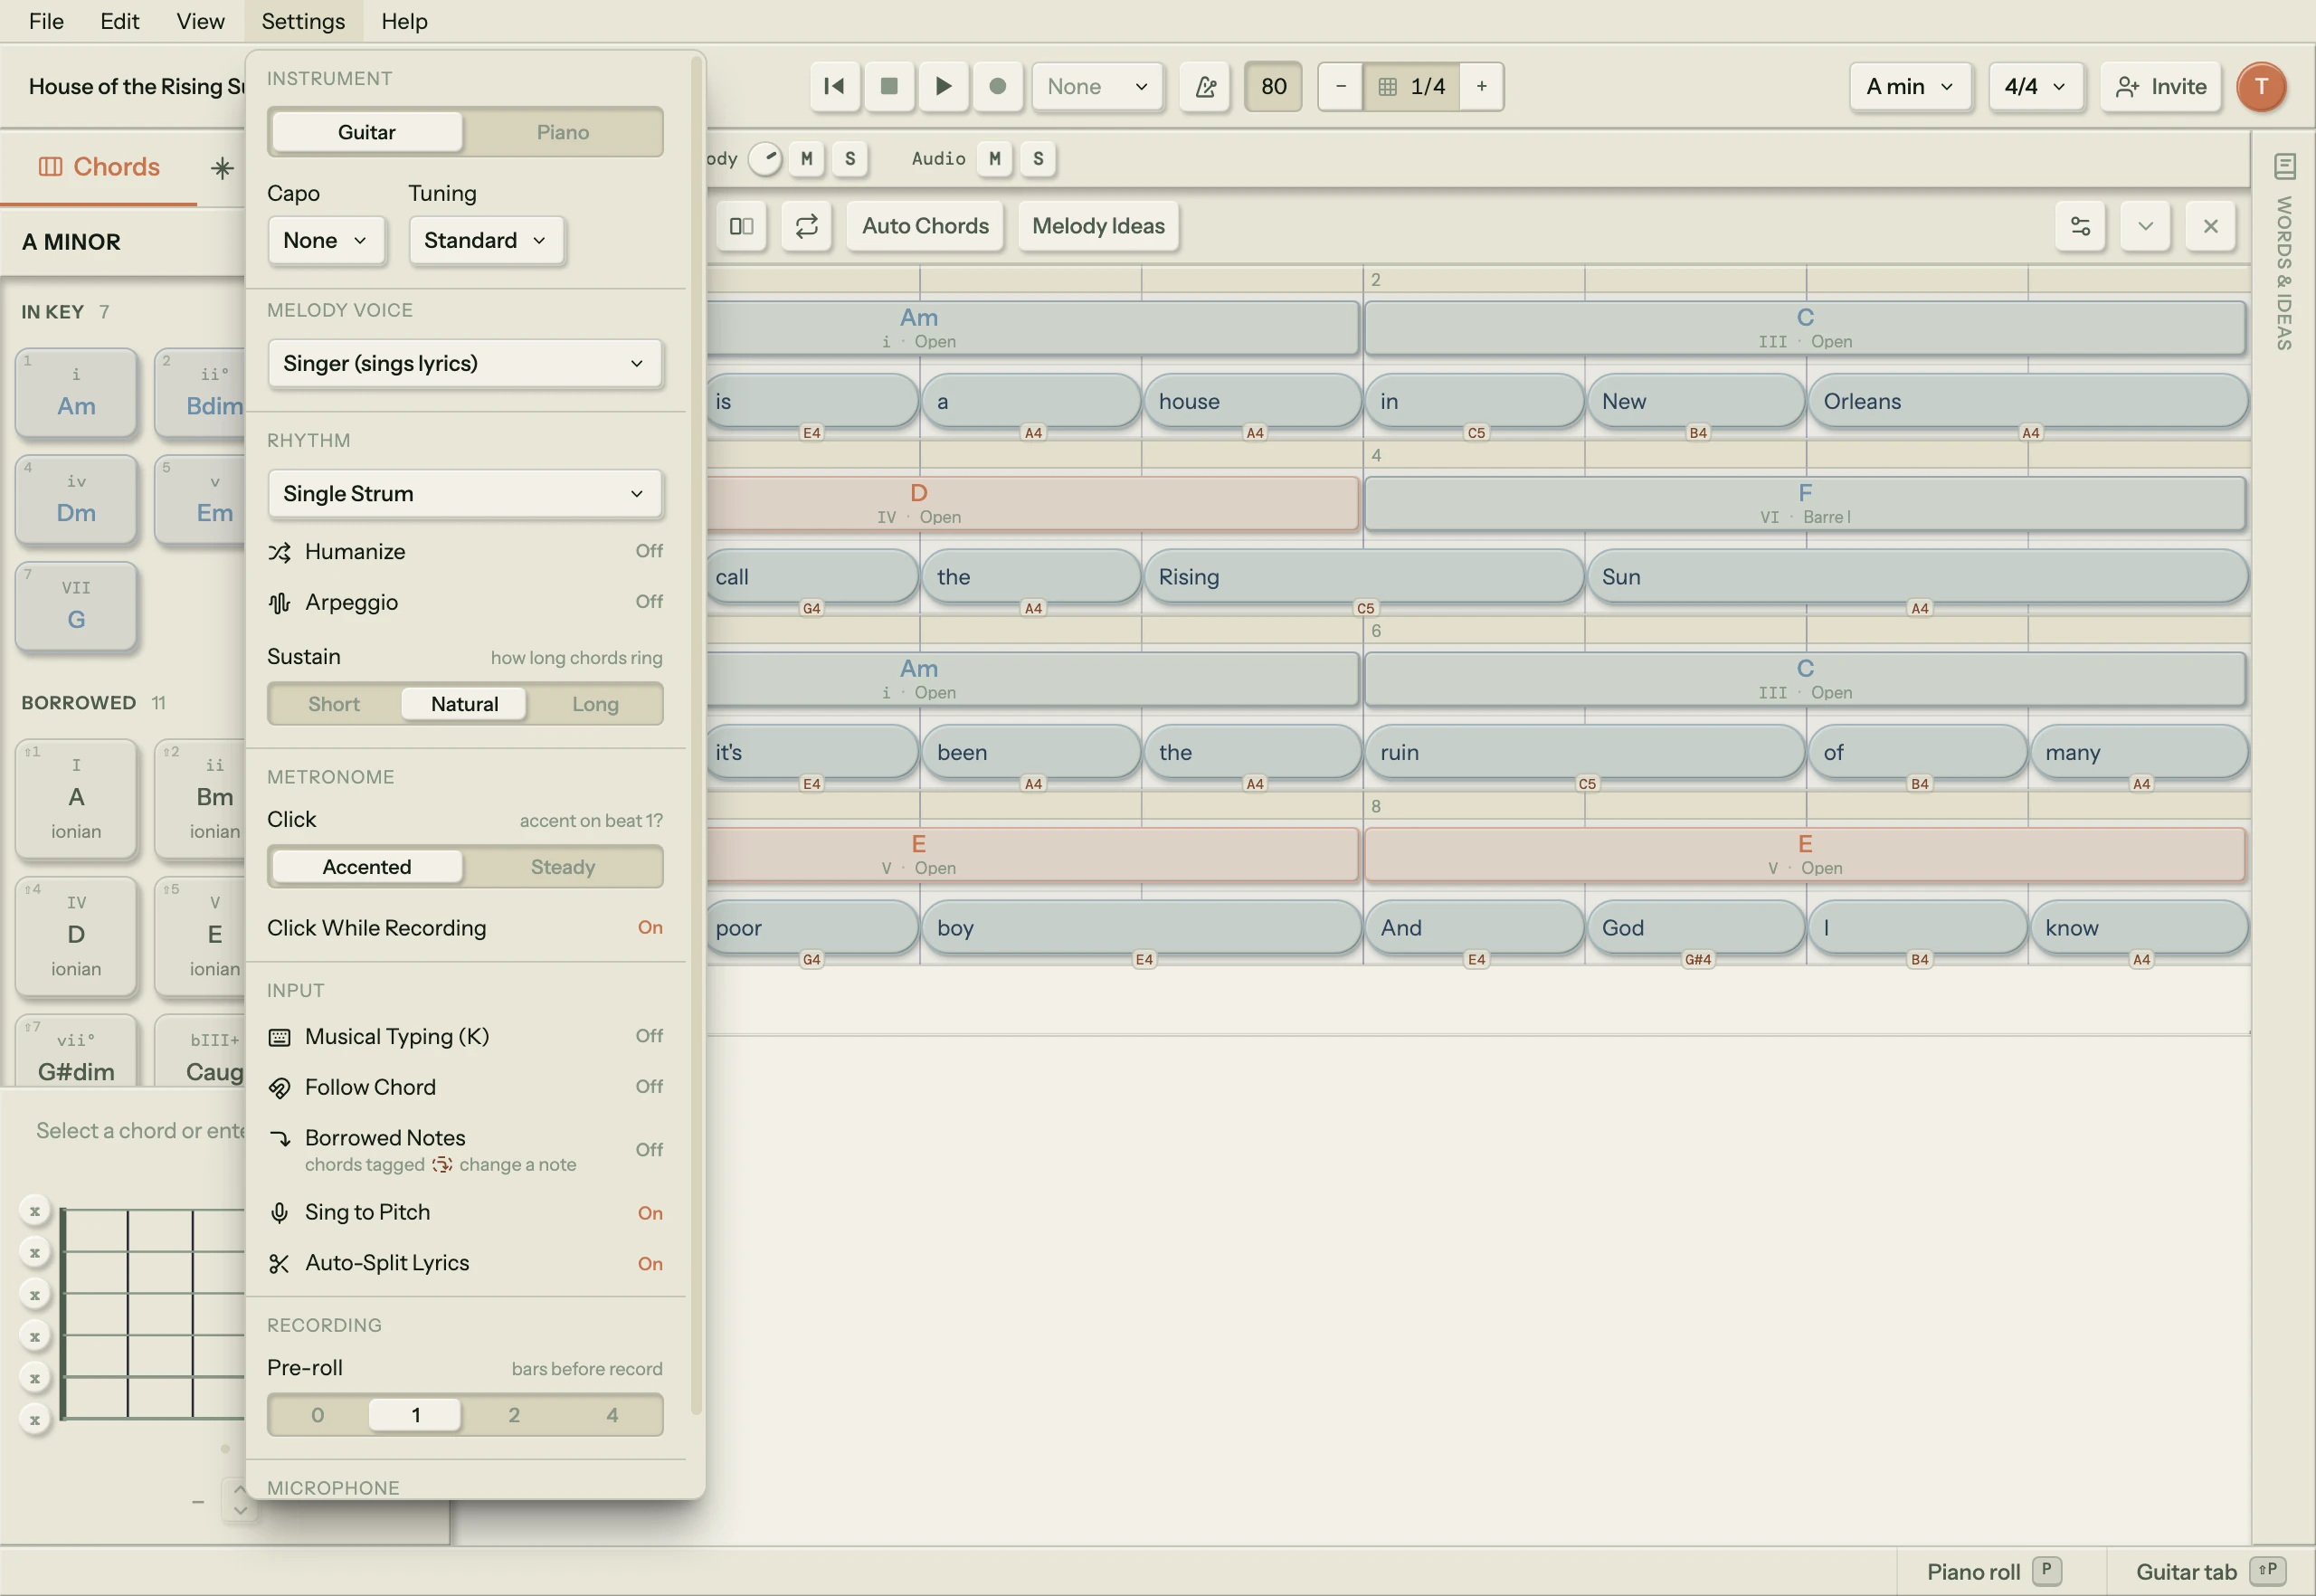
The desktop app has no menu bar inside its window. The same menus are in its native menu bar, at the top of the screen on a Mac and along the top of the window on Windows. There, each setting in Settings is a menu of its own or an item with a tick, and File has Delete Song… (which asks to leave instead when the song was shared with you). Keyboard Shortcuts & Tips lists the desktop menus' shortcuts.
Left zone: identity and view
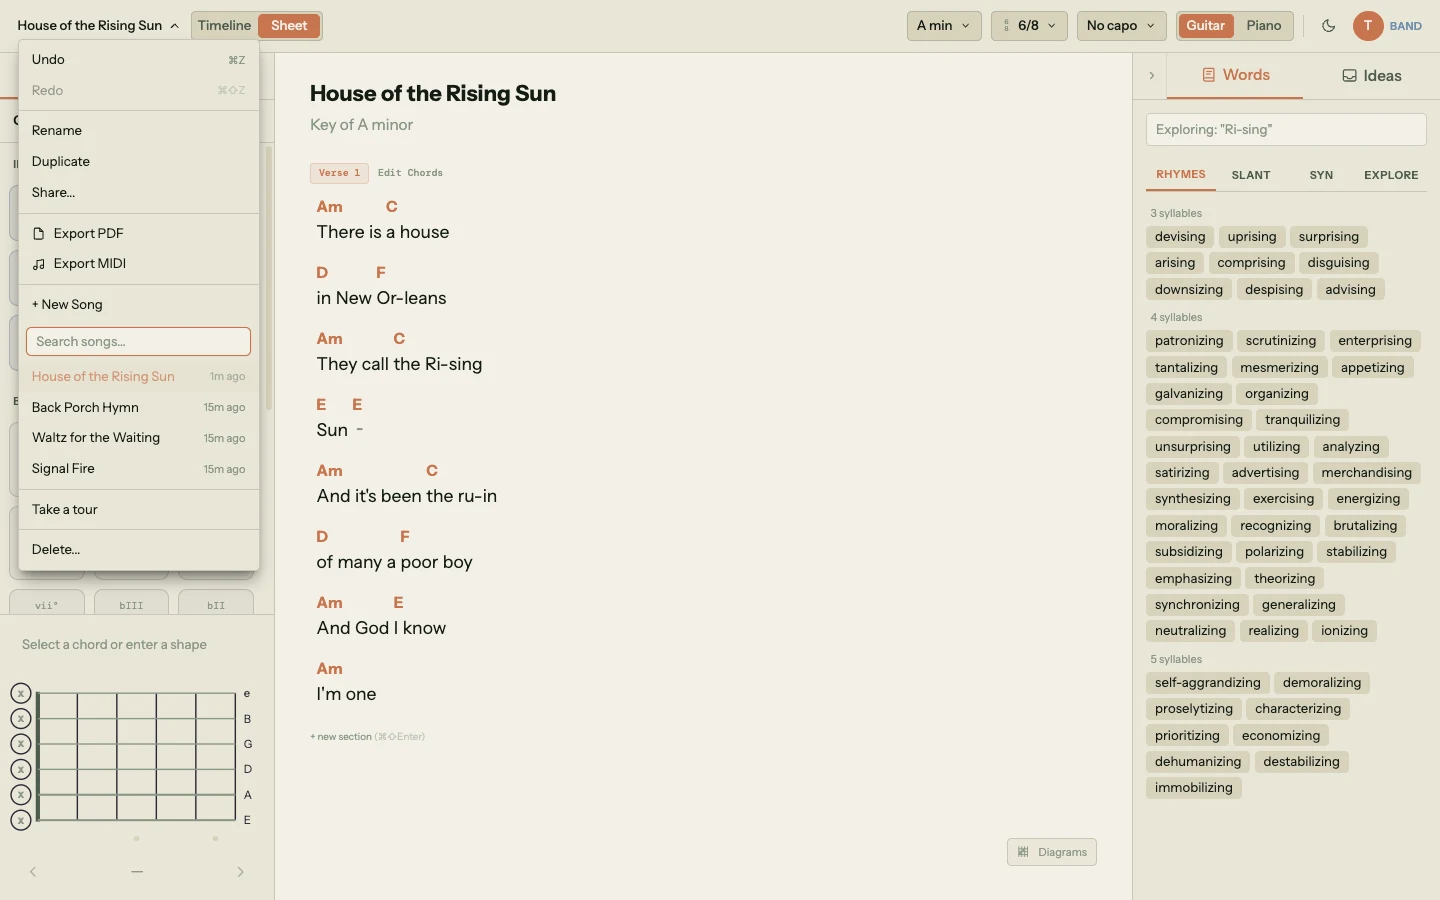
- Song menu. The song title is the trigger. Clicking it opens your songs: a filled New Song button (in the desktop app,
⌘Non a Mac orCtrl+Non Windows), Play Live, a search field, the song list grouped into folders, and This song's folder at the bottom, which files the song you have open. This is where you switch songs without leaving the canvas. To rename the song, double-click the title, or hover it and click the pencil. In the plugin, the menu holds New Song and your cloud library, or Sign in.
- View toggle. Timeline or Sheet, covered above.
- Ideas. Opens the Ideas inbox, with a count of the captures waiting in it.
Center zone: transport and timing
- Transport. Return to start, stop, play/pause, and record, with the playback engine driving the metronome and accompaniment.
- Record picker. Beside the record button, it names what the next take captures: No track, Audio, or Melody. Chapter 10 covers it.
- Metronome. A click-track toggle. Always on during recording, regardless of this setting.
- Tempo. The current BPM. Drag vertically to nudge, or double-click to type a number.
- Grid snap. A
−/+stepper showing the current snap division (1/4, 1/8, and so on). The,and.keys step it from the keyboard. Chapter 5 covers what each division does.
Right zone: song context
- Key chip. Shows the current key (for the demo song, A minor). Click it to change the key or mode. Chord suggestions, borrowed chords, and modulation routes all read from this.
- Time signature chip. Shows the song's time signature, e.g.
6/8. Click it for the time-signature presets and Bars per line. The instrument, capo and tuning are in Settings, and View > Nashville Numbers switches chord names to numbers. - User menu. Your account, whether you're on Free, the free trial or the Song Cage licence, and Sign out. The plugin has none: its account is at the bottom of the File menu.
Hover any toolbar control for a tooltip if you're not sure what it does.
2.5 The Left Sidebar
Your song list lives in the Song menu, not in a sidebar: click the song title to see every song you've created, with the current song highlighted. (The sidebar on the left of the window is the chord sidebar, covered next.)
Click any song to switch to it. The current song auto-saves whenever you change it, so switching is safe: nothing is lost. The New Song button at the top of the menu creates an empty song and switches to it immediately.
If you're collaborating on a song, shared songs appear in the same list with a small shared-owner indicator. You leave a shared song the way you'd delete one you own: right-click it in the list and choose Leave song, or open it and choose File > Leave Song…, which takes the place of Delete….
2.6 The Chord Sidebar
The chord sidebar is on the left side of the canvas when you're working with chords. It's where most of the theory lives. It has two main modes, each with its own tab.
Chords Tab
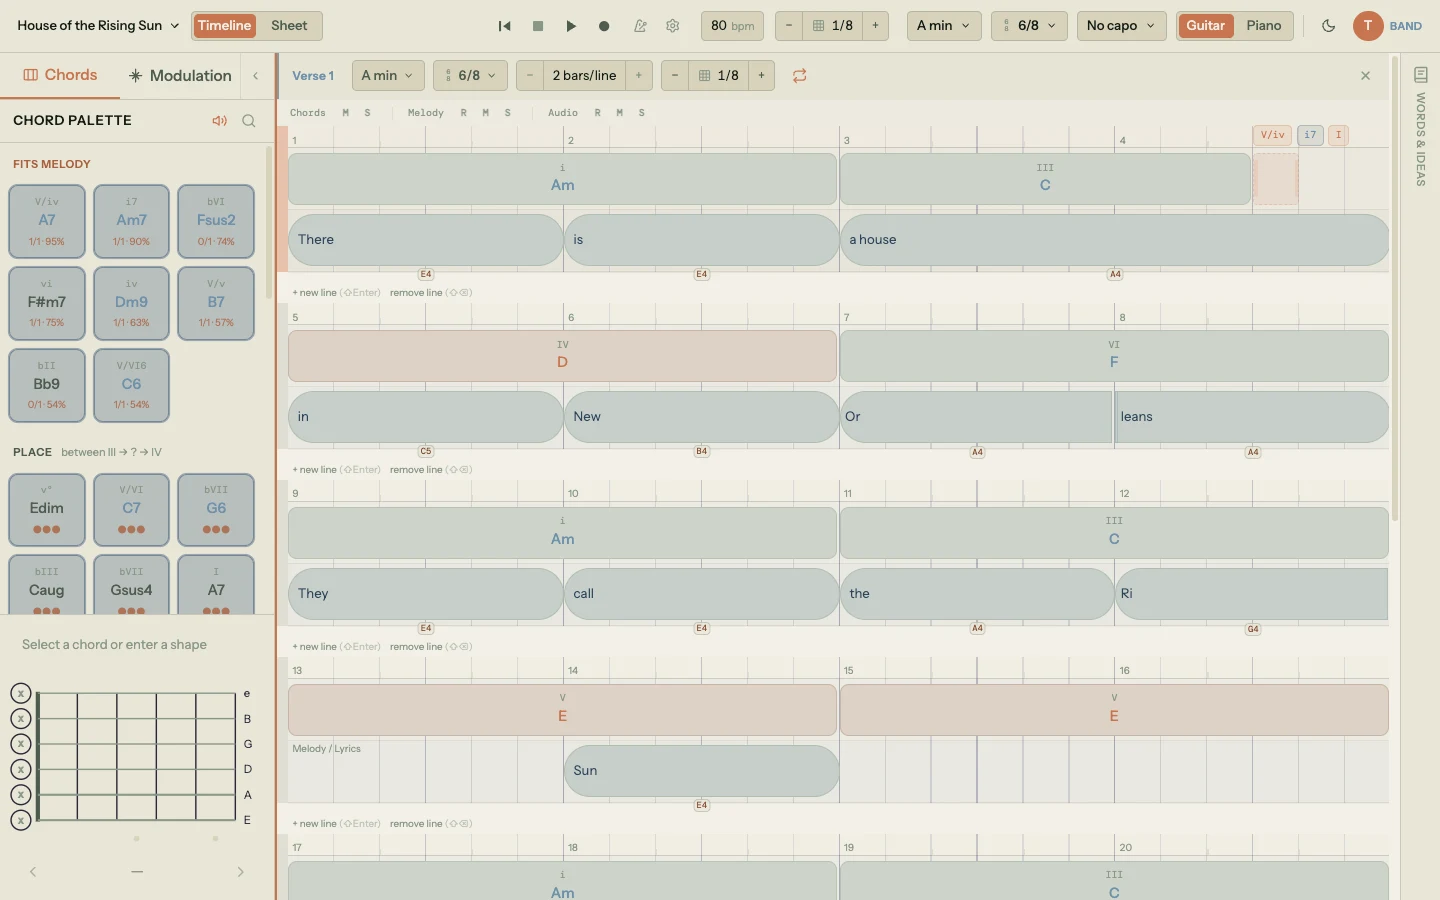
The chord palette is split into three sub-tabs: In Key (the diatonic chords for your current key), Borrowed (chords from parallel modes, like Dorian or Mixolydian), and Secondary Dominants (V chords that resolve to non-tonic targets). Click any chord to drop it onto the selected beat, or drag it onto the timeline directly.
When you click an empty spot in the chord lane, the chords tab adds a section near the top: Fits Melody (chords ranked by how well they contain the melody notes at that beat) when there is melody under the beat, or Place (chords ranked by how naturally they follow the chord before them) when there isn't. These update live as you move around the timeline. Hover any suggestion for a tooltip that explains why it was ranked the way it was.
Click a chord that's already on the timeline and the top of the tab offers chords to replace it with instead: Fits Melody when there's a melody under it, otherwise Replace. Click any chip to try it in that chord's place, click it again (or press Enter) to keep it, or press Escape to put the original back. Keyboard Shortcuts & Tips covers doing the same from the keyboard.
The chord sidebar is also how you change chord extensions (7th, sus4, add9, and so on). Click the ⋯ button on any chord chip to open the extensions popover.
Modulation Tab
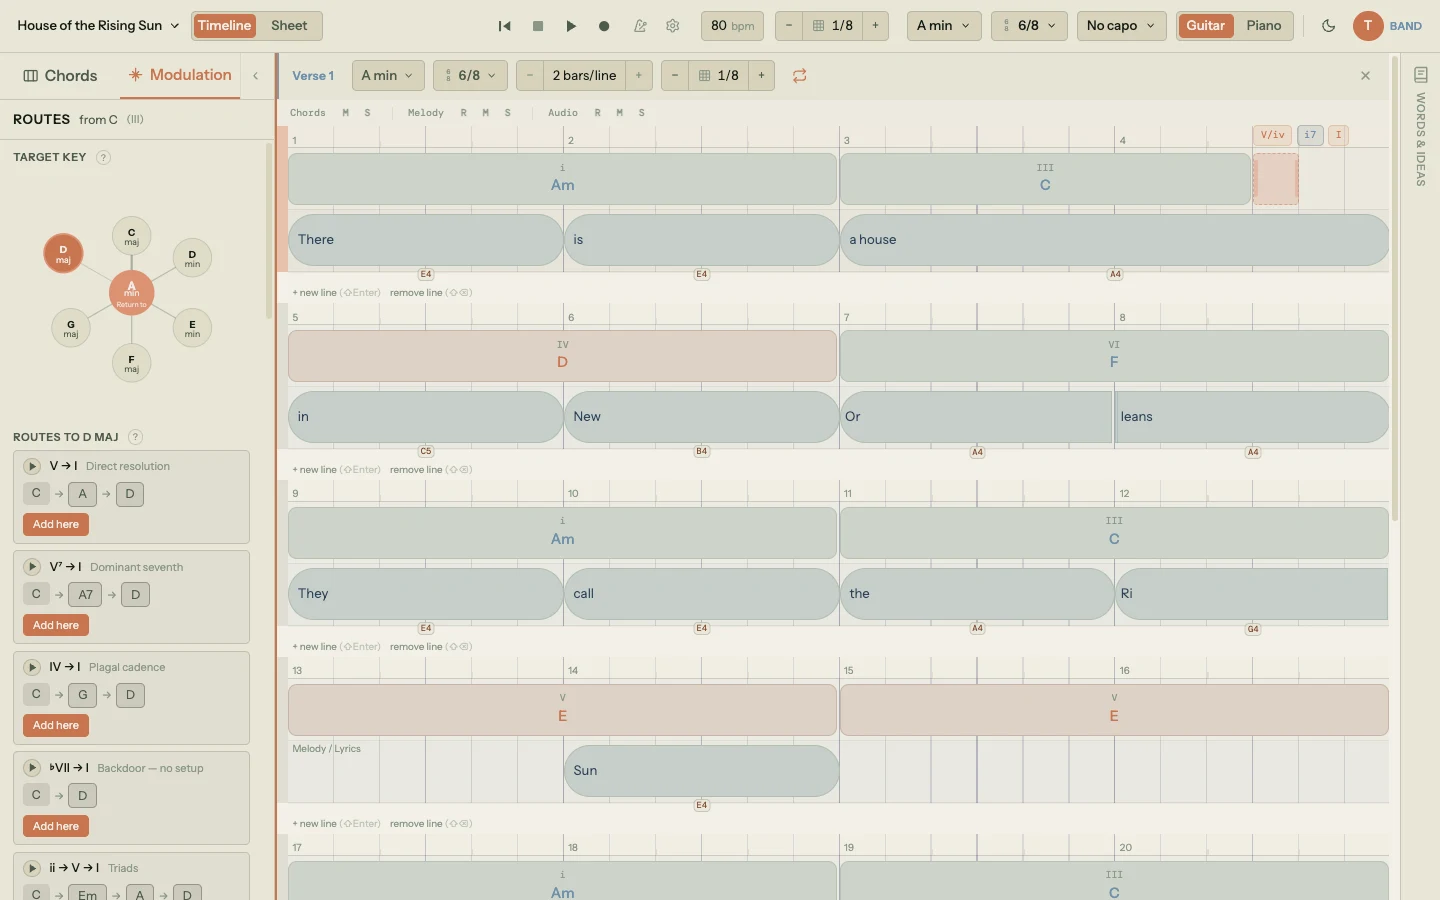
The modulation tab is the key map. Select a target key and it shows you chord-by-chord routes to get there, plus return routes to come home. Routes are named (direct resolution, pivot chord, tritone substitution, and others) so you can pick the one whose feel matches the moment in your song where the key change lands.
2.7 The Right Panel
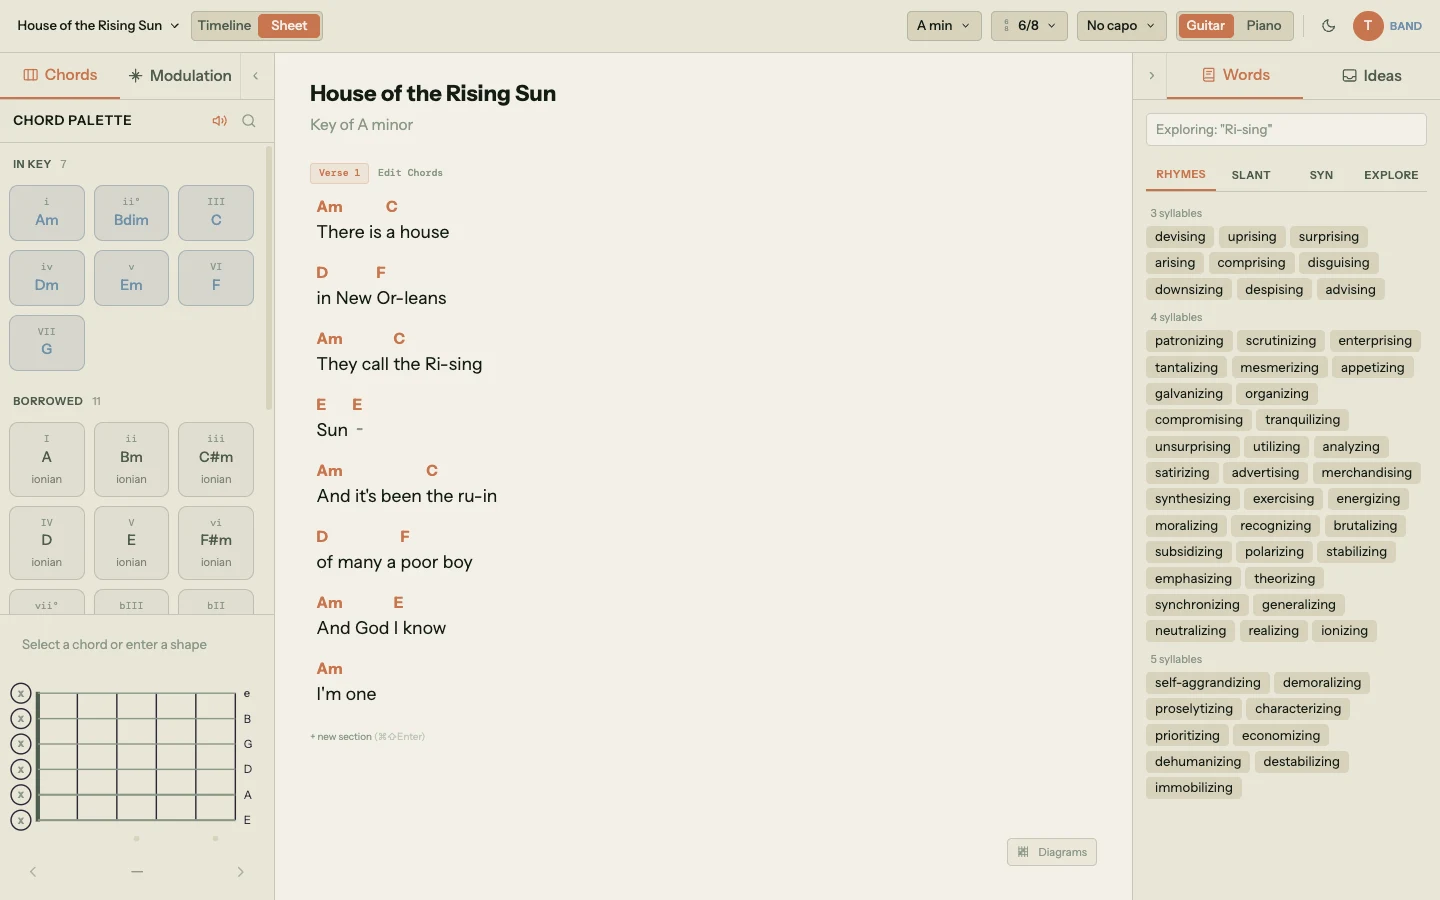
The right panel sits at the far right of the window and has two tabs of its own:
- Words. The word tools panel. Select any word in your lyrics (in either view) and the panel shows rhymes, slant rhymes, synonyms, and the Explore and Word Collider tools for chasing related words. It auto-follows your text cursor, so you almost never need to search.
- Ideas. The Ideas Inbox. Shows everything waiting to be used: captures synced from the mobile app, recordings and written notes you imported from a folder or sent from your phone, and lyrics you pasted in. It's covered on its own below.
You don't need the right panel open all the time. Close it when you want to give the canvas more breathing room; reopen it from the toolbar when you want rhymes or your inbox back.
The Ideas Inbox
The Ideas tab is where material waiting to be used lands: captures from your phone, and anything you brought in yourself. It's a reading surface as much as a staging area: you can open an idea and read the whole thing in the panel, without dropping it into a song first to find out what's in it.
Getting things in is a chapter of its own. The Ideas Inbox covers pointing Song Cage at a folder of voice memos, sending recordings and notes straight from your phone without installing anything, importing written notes out of Obsidian, Evernote, Notion or Apple Notes, and the full-canvas Ideas room with search and filters for when the panel is too narrow. This section covers the panel itself.
Click a card to expand it. Collapsed, a card shows small icons for what's inside (lyrics, chords, audio), its title, and when you last touched it. Expanded, it shows the contents in full, broken into pieces you can use independently:
- A chord piece, the idea's progression.
- A lyrics piece per section. When the capture has chords sitting over the words, the two collapse into one combined piece instead, so the chords travel with the line they belong to.
- One audio piece per voice memo, with a play button so you can listen in the panel.
Each of those has a drag grip, and each drags onto the timeline on its own. Drop one on a section and it appends into that section. Drop a chord piece directly onto a chord lane and it lands at the beat you dropped it on, rather than at the end. Drop onto the gap between sections and Song Cage creates new sections there instead. While you drag, the timeline shows a ghost of exactly what will land, so there are no surprises on release. A voice memo dropped into a song is copied, not moved: the original stays in your inbox.
Above the list are a search field and two rows of filters: All / Lyric / Chord / Voice, and an Inbox / Archived toggle. Search reads more than titles. It looks inside the lyrics, the section tags, and the chord names, and when the match is in a lyric rather than the title, the matching line prints under the title with the hit highlighted, so you can see why a row came back. Most captures are titled with a timestamp, which is what makes that worth having. If a search comes back empty, Song Cage tells you when the matches are sitting in Archived or under a different type tab, rather than claiming nothing matched.
Right-click a card (or use its menu) for Rename, Archive or Restore, and Delete idea. You can also double-click the title to rename in place. Inside an expanded card, individual pieces can be deleted on their own, so you can throw away a dead chord sketch and keep the lyric that came with it.
An idea you've already dropped into a song doesn't vanish. It stays in the list, still draggable, marked as used, which is why the tab's badge can read lower than the number of cards you can see. If you want one back in the count, its menu gains a Move to inbox item once it's been used.
The badge itself says two things at once. The number is the backlog: captures you have not used in a song yet, and it does not drop because you looked at the list, only because you used or archived something. The fill is what is new: solid when something has arrived since you last had the list on screen, outlined once you have looked. Opening the Ideas tab or the drawer is what counts as looking, on this device.
That covers the layout. Every later chapter assumes you know where these regions are, so if you ever lose your bearings, this is the page to come back to.