Two views, one set of lyrics. Sheet view feels like a notepad. Timeline view puts every word on the beat grid. Write in whichever one matches the moment.
What you'll learn
- How to write lyrics in Sheet view (typing naturally, like a notepad)
- How to write lyrics in Timeline view (placing words on the beat grid)
- How to edit, move, and resize lyric blocks
- How overlap resolution works when blocks collide
- How to select and move multiple blocks at once
- How the two views stay in sync
Chapter 5 covered the canvas: sections, lines, and the beat grid. This chapter is about the first thing most writers put on that grid. A lyric block is a word (or a few words) sitting at a specific beat, lasting a specific duration. Everything else in Song Cage, from chord suggestions to syllable timing to melody notes, builds on top of these blocks.
6.1 Two places to write
Song Cage gives you two views for writing lyrics, and they share the same underlying data. Every word you type in one view appears in the other.
- Sheet view feels like a notepad. Click into a section and type. Words flow left to right, lines stack top to bottom. You don't think about beats or grids. This is where you go when the words are coming faster than the rhythm.
- Timeline view puts every word on the beat grid as a draggable block. You see exactly where each word falls relative to the chords above it. This is where you go when the rhythm matters: when you need "New" to land on beat 6, not beat 5.
Neither view is primary. Most writers switch between them several times per session. The next two sections cover each one.
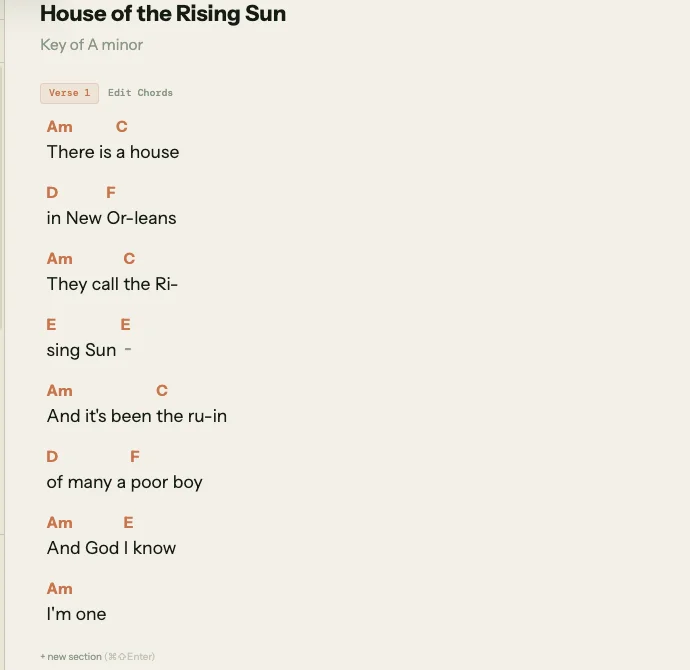
6.2 Sheet view: writing like a notepad
Switch to Sheet view using the view toggle in the toolbar. Click into any section and start typing. It feels like a text editor: words wrap across the line, Enter starts a new line, and you can select, cut, copy, and paste normally.
Each line in the textarea corresponds to a visual line in the section (the same lines you saw in Chapter 5). When you press Enter, Song Cage adds a new line to the section and moves your cursor into it. When you press Backspace at the beginning of a line, it merges with the line above.
Press Escape or click outside the section to commit your edits. Song Cage takes the text you typed and distributes it across lyric blocks on the beat grid. Each word gets at least one beat of duration. If a word already existed at that position, its text updates in place. If you typed new words, new blocks are created. If you deleted words, their blocks are removed.
Syllable hints with hyphens
If you type a hyphen inside a word, Song Cage treats it as a syllable split. Typing Ri-sing creates a single lyric block with the clean text "Rising" plus a split marker between the two syllables. In Timeline view, the block renders as two visual compartments: "Ri" and "sing", each sitting on its own beat. Chapter 8 covers syllable splits in depth.
Chord placement in Sheet view
Chords appear above the lyrics in Sheet view, floating over the word they're aligned to. You can place chords directly in Sheet view by clicking the small + markers that appear between words, then picking a chord from the palette. When you place a chord in the middle of a multi-word block, Song Cage automatically splits the block at the nearest word boundary so the chord lands cleanly.
6.3 Timeline view: writing on the grid
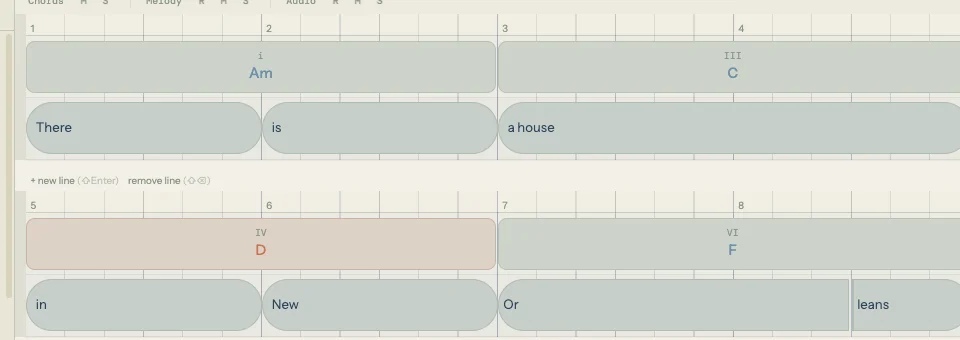
Switch to Timeline view. Each section shows two lanes: the chord lane on top and the lyric lane below. The lyric lane is where you'll work.
Creating a lyric block
An empty spot in the lyric lane shows a faint hint: Click for melody, double-click for lyrics.
- Single-click creates a melody-only block: a small note on the grid with no text, just a pitch. This is for capturing a melody fragment before you have words. Chapter 10 covers melody input in detail.
- Double-click opens a text input right on the grid. Type a word or phrase and press Enter. Song Cage creates a lyric block at that beat with a duration based on word count: one word gets one beat, two words get two beats, and so on, up to the available space before the next block.
Press Enter to commit the text and automatically advance to the next empty beat, ready for the next word. Press Escape to commit without advancing. This Enter-to-advance flow is how most writers fill out a line quickly: double-click to start, then Enter, Enter, Enter through the phrase.
Editing an existing block
Double-click any lyric block to re-enter editing mode. The text input appears with the current text selected, ready to retype or modify. The same Enter and Escape shortcuts apply.
6.4 Moving and resizing lyric blocks
Moving a block
Grab any lyric block and drag it horizontally. The block snaps to the grid at the current snap division (set in the section header, as Chapter 5 described). Release to drop it at the new position.
If you hold Cmd (Mac) or Ctrl (Windows/Linux) while dragging, Song Cage creates a copy of the block at the new position instead of moving the original. The original stays where it was.
You can also drag a block into a different section. While dragging, move the cursor into another section's lyric lane. A ghost outline shows where the block would land. Release to drop it there.
Resizing a block
Hover near the left or right edge of a lyric block. The cursor changes to a trim indicator. Drag the edge inward to shorten the block, or outward to lengthen it. The block's duration changes in beat increments matching the snap division.
If the block has syllable splits, resizing cascades through the split positions to keep each syllable at least one snap division wide. Chapter 8 covers this cascade in detail.
Double-click an edge to snap the block's edge to the nearest neighbor, filling the gap between them. This is a quick way to extend a block to meet the next one without dragging.
6.5 Overlap and trimming
When you drop a lyric block on top of another, Song Cage resolves the overlap automatically using DAW-style trimming. The block you moved is the "active" block. Any block it overlaps gets trimmed from the overlapping edge:
- If the active block covers the left portion of another block, the other block's start is trimmed to the active block's end.
- If the active block completely covers another block, the covered block is deleted.
- Trimmed blocks that would shrink below a minimum duration are removed entirely.
This resolution happens on pointer-up, not during the drag. While you're dragging, you see the overlap. When you release, it resolves. This matches how DAWs like Logic and Ableton handle region overlap, so the behavior should feel familiar if you've used one.
6.6 Selecting multiple blocks
Click a lyric block to select it. A ring appears around it.
Cmd+click (Mac) or Ctrl+click (Windows/Linux) to toggle additional blocks in and out of the selection.
Shift+click to range-select: every block between the previously selected block and the one you Shift+clicked gets added to the selection.
With multiple blocks selected, you can:
- Drag any selected block and all selected blocks move together, maintaining their relative spacing.
- Delete to remove all selected blocks at once.
- Copy-drag (Cmd+drag) to duplicate the entire selection at a new position.
Click an empty area in the lyric lane to clear the selection.
6.7 How the two views stay in sync
Sheet view and Timeline view are not two copies of your lyrics. They are two renderings of the same stored data. Every lyric block has a text field, a beat position, a duration, and optional syllable splits and melody notes. Sheet view renders those blocks as flowing text. Timeline view renders them as draggable rectangles on a grid.
When you edit in Sheet view, Song Cage runs a reconciliation step that matches your typed text against the existing blocks. Words that haven't changed keep their block (and their beat position, duration, and melody notes). Words that changed get updated. New words create new blocks. Deleted words remove their blocks. This means your melody notes survive a lyric edit, as long as the word they're attached to still exists at the same position.
When you edit in Timeline view, the change is immediate: you're directly manipulating the block's text, position, or duration. Sheet view re-renders to reflect the change the next time you switch to it.
The two views are complementary. Sheet view is faster for writing. Timeline view is more precise for positioning. Use both.
That covers getting words onto the grid. The next chapter covers the tools that help you find the right words: rhymes, synonyms, and the Word Collider.