Flip a toggle and the entire app reshapes around your instrument. Guitar mode gives you fretboard diagrams, real chord shapes, and a capo. Piano mode gives you a keyboard, four voicing types, invertible voicings, and octave control. Both feed the same timeline.
What you'll learn
- How the instrument toggle changes the panel, diagrams, and playback sound
- How to read fretboard diagrams and browse guitar voicings
- How a capo transposes chord shapes while keeping the sounding pitch correct
- How to read keyboard diagrams and navigate voicing types, inversions, and octave offset
- How to build custom voicings by clicking frets or keys
- How your instrument choice shapes the sound on playback and the diagrams in your exports
Chapter 9 introduced voicings: what they are, how to browse them, and how voice leading smooths a progression. This chapter goes deeper into each instrument mode. The toggle in the toolbar is the entry point. Everything downstream follows from which side of that toggle is active: the right-side panel, the mini diagrams on chord blocks, the playback samples, and the exported diagrams.
12.1 The instrument toggle
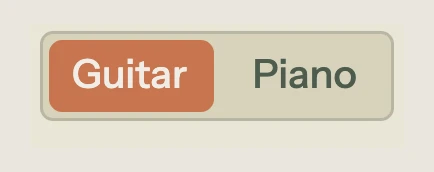
The toggle sits in the toolbar, between the transport controls and the view toggle. It shows two labels, Guitar and Piano, with a sliding accent bar under the active mode. Click the inactive side to switch.
Switching instruments changes four things at once:
- The right panel swaps between a fretboard (guitar) and a keyboard (piano).
- Mini diagrams on chord blocks switch between fretboard thumbnails and keyboard thumbnails.
- Playback switches between a steel-string acoustic guitar sample and an acoustic grand piano sample.
- The capo control appears in the toolbar when Guitar is active and disappears for Piano.
The instrument choice is session-level. It applies to the entire song while you're working, and both voicing types (guitar and piano) are stored independently on each chord block. Switching instruments doesn't erase the voicings you've already set for the other instrument.
12.2 Fretboard diagrams

When Guitar is active, the right panel shows an interactive fretboard. It also appears as a mini thumbnail on selected chord blocks when the Chord Diagrams toggle is on (right-click any chord block to toggle it).
How to read the diagram
Six horizontal lines represent the six strings, displayed from high E at the top to low E at the bottom (the same orientation as looking down at your guitar while playing). Dots on the grid mark fretted positions. Above the nut:
- O means the string rings open.
- X means the string is muted.
When the voicing uses frets above position 4, the diagram scrolls to center the voiced frets and shows a position label like 5fr on the side.
Note function colors
Each dot is color-coded by its role in the chord. The root, third, fifth, and extensions each get a distinct color, so you can see at a glance where the root sits in the voicing and which string carries the third. String labels below the diagram show the pitch class of each sounding string (e.g., A, C, E for an Am chord) or the string name (e, B, G, D, A, E) for muted strings.
The strum button
A Strum button below the fretboard plays the current voicing through the guitar sample. The notes sound sequentially with a slight stagger, like a real downstroke. This is the quickest way to hear how a voicing sounds without placing it on the timeline.
12.3 Browsing guitar voicings
Song Cage ships with a database of real guitar chord shapes: open chords, barre chords, and higher-position voicings. When you place a chord on the timeline, the app picks a default voicing. To explore alternatives, use the voicing carousel in the right panel.
The carousel
Below the fretboard diagram, left and right arrows step through voicings one at a time. A label between the arrows identifies the current voicing:
- Open: uses open strings, typically the first four frets. These are the shapes most guitarists learn first.
- Barre V (or another Roman numeral): a barre chord rooted at the indicated fret. The Roman numeral tells you the position.
- Pos III: a non-barre voicing at the third fret (or whichever position).
The popup browser
Click the voicing label to open a popup showing every available voicing in a three-column grid of mini fretboard thumbnails. The current voicing is highlighted. Click any thumbnail to select it. For common chords like Am or G, you might see a dozen or more voicings. For rarer extensions, the set is smaller.
Arrow-key cycling
During audition mode (when you click a chord block to edit it), the left and right arrow keys cycle through voicings without opening the popup. Each voicing plays a preview strum as you land on it, so you can audition by ear.
12.4 Capo
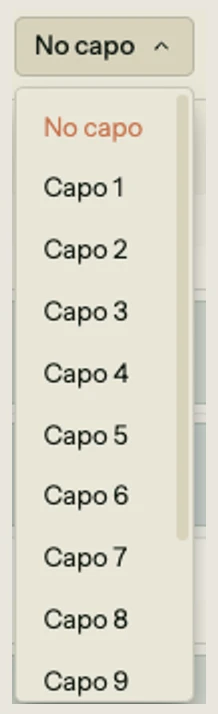
The capo control appears in the toolbar only when Guitar mode is active. Click it to open a dropdown with positions 0 through 12. Setting a capo above zero changes how voicings are looked up and displayed, but not the chord names on the timeline.
Shape chord vs. sounding chord
When you set a capo, Song Cage transposes each chord name down by the capo interval to determine the shape chord: the fingering you actually play. For example, with a capo on fret 2, an A minor chord on the timeline is fingered as a G minor shape. The fretboard panel shows the G minor shape diagram, and the label displays the shape chord name alongside the sounding chord name.
The chord blocks on the timeline still show the sounding chord name (Am in this case). That's the pitch the audience hears. The fretboard panel is where you see the shape.
The capo indicator
When a capo is active, a small C2 (or whichever fret) label appears next to the nut on the fretboard diagram, so you always know where the capo sits.
Auto-revoicing
When you change the capo value, every chord block on the timeline gets a new default guitar voicing for its transposed shape chord. If you had manually selected a specific voicing for a chord, the auto-revoicing replaces it with the best match for the new shape. In practice, most writers set the capo early and then browse voicings, rather than switching capo after placing chords.
Guitar-only
Capo is a guitar concept. In Piano mode, the capo dropdown disappears and has no effect on playback or voicing display. The capo value is stored on the song, so if you switch back to Guitar, your capo setting is still there.
12.5 Building a guitar voicing by hand
When no chord block is selected and no palette chord is previewed, the fretboard panel enters free-edit mode. You can click directly on the fret grid to place or remove finger positions on any string.
Chord detection
As you place fingers, Song Cage identifies the chord in real time. It extracts the pitch classes of all sounding strings, matches them against known chord types, and displays the detected chord name above the fretboard. If multiple names match (for instance, a set of notes that could be read as Am7 or C6), the primary match appears first with up to two alternatives shown alongside it.
Detection requires at least three sounding strings. Below that threshold, the display shows a question mark.
Placing a detected chord
Once detection produces a chord name, you can drag it from the fretboard panel onto the timeline to create a new chord block with that voicing attached. The voicing you built by hand travels with the chord.
Editing a selected block
You can also edit an existing chord block's voicing by selecting it and then clicking frets in the fretboard panel. Changes apply immediately to the selected block. If the new fret positions produce a different chord name, the block's chord name updates to match.
12.6 Keyboard diagrams
When Piano is active, the right panel shows an interactive keyboard. Mini keyboard thumbnails also appear on selected chord blocks when Chord Diagrams are toggled on.
How to read the diagram
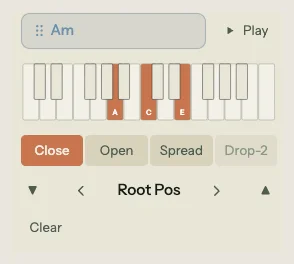
The keyboard displays two to three octaves of white and black keys. Active chord tones are highlighted in the accent color with their pitch class labels visible (C, E, G, etc.). Inactive keys appear in their natural colors: white or dark gray.
Like the fretboard, each highlighted key is color-coded by its function in the chord: root, third, fifth, or extension. The keyboard auto-ranges to fit the voicing: it expands to show at least two octaves and centers the highlighted notes.
The play button
A Play button below the keyboard sounds the current voicing through the piano sample. All notes attack simultaneously, unlike the staggered guitar strum. This previews the voicing without placing it on the timeline.
12.7 Piano voicing types and inversions
Piano voicings have three independent controls: type, inversion, and octave offset. Together they produce a wide range of sounds from the same chord name.
Voicing types
Four buttons above the keyboard select the voicing type:
- Close: all chord tones stacked within a single octave, ascending from the bass note. Compact and clear. This is the default.
- Open: the second-from-bottom note is moved up an octave, opening a gap in the middle of the chord. Sounds airier than close position.
- Spread: the root sits in a low octave (octave 3) while the remaining notes are placed in octave 4 and above. This creates a wide, orchestral spacing.
- Drop-2: the second-from-top note is dropped down an octave. This is a staple jazz voicing, available only for chords with four or more notes (seventh chords and beyond). For triads, the Drop-2 button is disabled.
Each type has its own character. In practice, most writers start with Close for clarity, then switch to Spread or Drop-2 when they want a specific texture.
Inversions
Below the type selector, an inversion control lets you choose which note sits in the bass:
- Root position: the root is the lowest note (e.g., C-E-G for a C major chord).
- 1st inversion: the third is the lowest note (E-G-C).
- 2nd inversion: the fifth is the lowest note (G-C-E).
- 3rd inversion: the seventh is the lowest note. This is only available for seventh chords and larger.
Inversions apply within the selected voicing type, so "Open, 1st inversion" gives you a different result than "Close, 1st inversion." The combination of four types and up to four inversions means a simple triad has twelve voicings, and a seventh chord has sixteen.
Octave offset
Two buttons (▼ and ▲) shift the entire voicing up or down by one or two octaves. The range spans from Octave 1 to Octave 5 (the default is Octave 3). This control is useful when you want the same voicing shape but at a different register: a bass-heavy spread voicing for an intro, or a bright close voicing for a bridge.
The voicing carousel
Like the guitar carousel, the piano carousel lets you browse voicings visually. Click the voicing label to open a popup showing every combination of type and inversion as mini keyboard thumbnails in a grid, grouped by type. Click any thumbnail to apply it.
12.8 Building a piano voicing by hand
The keyboard panel also supports free-edit mode. When no block is selected and no palette chord is previewed, click any key on the keyboard to toggle it on or off. The app detects the chord in real time, just as it does on the fretboard, and displays the chord name once at least three keys are active.
MIDI input
If you have a MIDI controller connected, note-on events from the controller toggle keys on the keyboard panel. This lets you voice chords on a physical keyboard and have the app identify them. MIDI input only processes note-on events (ignoring sustained or released notes), so you build up the chord one note at a time.
Placing and editing
The workflow is the same as on the fretboard: drag the detected chord name from the panel to the timeline to create a new block, or select an existing block and click keys to change its voicing directly.
12.9 Playback and export
Your instrument choice doesn't just change the visuals. It flows through to how your song sounds and how it's exported.
Playback sound
- Guitar: notes are triggered with a slight stagger (about 30 milliseconds per string), simulating a strum. The sample is a steel-string acoustic guitar with a short release.
- Piano: all notes in the voicing attack simultaneously. The sample is an acoustic grand piano with a longer sustain.
Both use the stored voicings. If a chord block has no voicing set for the current instrument, the app picks a default.
PDF chord sheets
Exported PDF chord sheets include mini voicing diagrams above the lyrics for each chord. In Guitar mode, these are tiny fretboard diagrams with dots, mute markers, and position labels. In Piano mode, they're mini keyboards with highlighted keys. The diagrams are drawn in solid black for print clarity.
If a capo is set, the PDF shows the shape chord names (what you finger) and notes the capo position at the top.
MIDI export
The MIDI file uses the exact voicings stored on each chord block. If you've optimized voice leading (Chapter 9), those smooth voicings are what get written. The instrument's MIDI channel and voicing pitches match what you hear during playback.
That covers both instrument modes: fretboards, keyboards, capo, voicing types, free-edit, and how it all feeds into sound and export. The next chapter covers playback and accompaniment: looping, count-in, the metronome, and how the playback engine turns your chords and melody into sound.